• Product

      Product

      Application Security Platform

      Use Cases

      Shift Left & DevSecOps Supply Chain Security Software Bill of Materials (SBOM) Container Runtime Security & Compliance Cloud Native Application Security
      What is Deepfactor and How Does It Work?
      4-Minute Video
      What is Deepfactor and How Does It Work? >
  • Pricing
    • Pricing Plans
  • Resources

      Resources

      All Resources Next-Gen AppSec Series Case Studies Demos Videos Glossary Webinars Whitepapers Workshops Latest Blogs Documentation
      Next-Gen AppSec Series—Deepfactor SCA: 80% Less Noise, 50% Lower Cost
      Next-Gen AppSec Series
      Next-Gen AppSec Series—Deepfactor SCA: 80% Less Noise, 50% Lower Cost >
  • Company
    • About
    • Leadership
    • Partners
    • News and Events
    • Careers
    • Contact Us
  • LOGIN
Cisco Logo Deepfactor is now part of Cisco | Learn more
Learn more
Deepfactor Logo
  • Product

      Product

      Use Cases

      Application Security Platform

      Use Cases

      Shift Left & DevSecOps Supply Chain Security Software Bill of Materials (SBOM) Container Runtime Security & Compliance Cloud Native Application Security
      What is Deepfactor and How Does It Work?
      4-Minute Video
      What is Deepfactor and How Does It Work? >
  • Pricing
    • Pricing Plans
  • Resources

      Resources

      All Resources Next-Gen AppSec Series Case Studies Demos Videos Glossary
      Webinars Whitepapers Workshops Latest Blogs Documentation
      Next-Gen AppSec Series—Deepfactor SCA: 80% Less Noise, 50% Lower Cost
      Next-Gen AppSec Series
      Next-Gen AppSec Series—Deepfactor SCA: 80% Less Noise, 50% Lower Cost >
  • Company
    • About
    • Leadership
    • Partners
    • News and Events
    • Careers
    • Contact Us
LOGIN
Deepfactor's Application Security Platform will no longer be offered for sale or renewal effective September 20, 2024.

Getting Started

  • QuickStart Guide
  • Install Deepfactor CLI
  • Deepfactor Support Matrix

Tutorials

  • SBOM & SCA
    • Artifact Releases
    • Deepfactor Scanner
    • Integrate Deepfactor scanner in your CI/CD pipelines
    • Scanning container images from private registries using Deepfactor CLI
    • Scan container images in K8s cluster
      • Scanning images from private registries in K8s cluster using Deepfactor
      • Scanning container images from private registries with basic authentication support in K8s
      • Scanning container images from private AWS Elastic Container Registry (ECR) in EKS on AWS Fargate
      • Scanning container images from private AWS Elastic Container Registry (ECR) in EKS on AWS EC2
  • Runtime Security
    • Introduction to Deepfactor Runtime Security
    • Deepfactor CLI Reference
    • Kubernetes workload
      • Run your Kubernetes workload with Deepfactor
      • Install Deepfactor Mutating Webhook
      • Configure Deepfactor Kubernetes admission webhook
      • Install Deepfactor K8s webhook on EKS Fargate
      • Selecting the pods you want to run with Deepfactor
      • Configuring application name, component name and component version in K8s webhook
      • Install Deepfactor mutating admission webhook using Argo CD
      • Install Deepfactor portal & webhook using Argo CD and vault
      • Use image pull secret for Runtime images
    • Containers/Other orchestration platforms
      • Run your Container Images with Deepfactor
      • Run containers in ECS with Deepfactor
    • Non-containerized workloads
      • Running non-containerized applications with Deepfactor

Deepfactor Platform

  • Introduction to Deepfactor
  • Alert Policies
  • Alert States and Triaging Flows
  • Deepfactor’s Correlation Capabilities
  • Organization and Teams
  • Role Based Access Control
  • Insights Knowledge Base
    • Privilege Separation and Privilege Dropping
    • Buffer Overflow Alerts
  • Knowledge Base
    • Deepfactor scan errors
    • K8s Webhook & Runtime Troubleshooting Guide
    • Tools for viewing CycloneDX and SPDX SBOMs
    • Graceful handling of pod restarts
    • Deepfactor telemetry events
    • Deepfactor Instrumentation Warning Messages
    • Best Practices for running your applications with Deepfactor in production environments
    • Golang Specific Notes
    • How to access Deepfactor Portal in different AWS subnet types
    • How the Deepfactor Management Portal Communicates With The Outside World
    • Language Specific Agents (LSA)
    • Mixed libc environments
    • Sensitive Information and Secrets in Process Environment Remediation
    • Running HAProxy with Deepfactor
    • Augmenting Alert Evidence with Runtime Stack Traces
  • FAQs
    • General FAQs
    • Open Source Disclosure

Integrations

  • Single Sign On (SSO) for authentication to Deepfactor
  • Integrate Jira with Deepfactor
  • Integrate Slack with Deepfactor
  • Okta
  • Deepfactor HTTPS webhook

Self managed Deepfactor portal

  • Deepfactor Portal architecture & deployment options
  • Install Self managed Deepfactor portal
    • Kubernetes Cluster
      • Prerequisites for deploying Deepfactor portal in Kubernetes Cluster
      • Deploying Deepfactor Portal in your Kubernetes Cluster
      • Install Deepfactor portal using Helm
      • Customizing Deepfactor portal deployment
        • Customizing your Deepfactor Portal Deployment in K8s
        • Deploy Deepfactor Portal With Resource Limits
        • Deploying Deepfactor Portal using external IP
        • Deepfactor Portal Installation with Existing Ingress Controller
    • AWS EC2
      • Prerequisites for installing Deepfactor Portal in AWS Cloud
      • Deploying Deepfactor on AWS using CFT
      • Install AWS Certificate Manager(ACM) certificate on Deepfactor portal EC2 instance
    • VMWare vSphere
      • Deepfactor Portal Proxy Configuration for OVA deployments
      • Prerequisites for deploying Deepfactor portal in VWware vSphere
      • Deploying Deepfactor on VMware vSphere
  • Manage Deepfactor Portal
    • Using Deepfactor APIs
    • Managing Users
    • Updating your Deepfactor Portal
    • Updating Deepfactor portal certificate
  • Deepfactor Portal Certificate
    • Generate certificate using cert-manager for Deepfactor portal
    • Create self-signed certificate for Deepfactor Portal on your K8s cluster
    • Create AWS Private CA Certificate for Deepfactor Portal on your K8s cluster
    • Create Let’s Encrypt certificate for Deepfactor Portal on your K8s cluster

Release Notes

  • Deepfactor Release Notes
  • Home
  • Docs
  • Tutorials
  • Runtime Security
  • Containers/Other orchestration platforms

Run your Container Images with Deepfactor

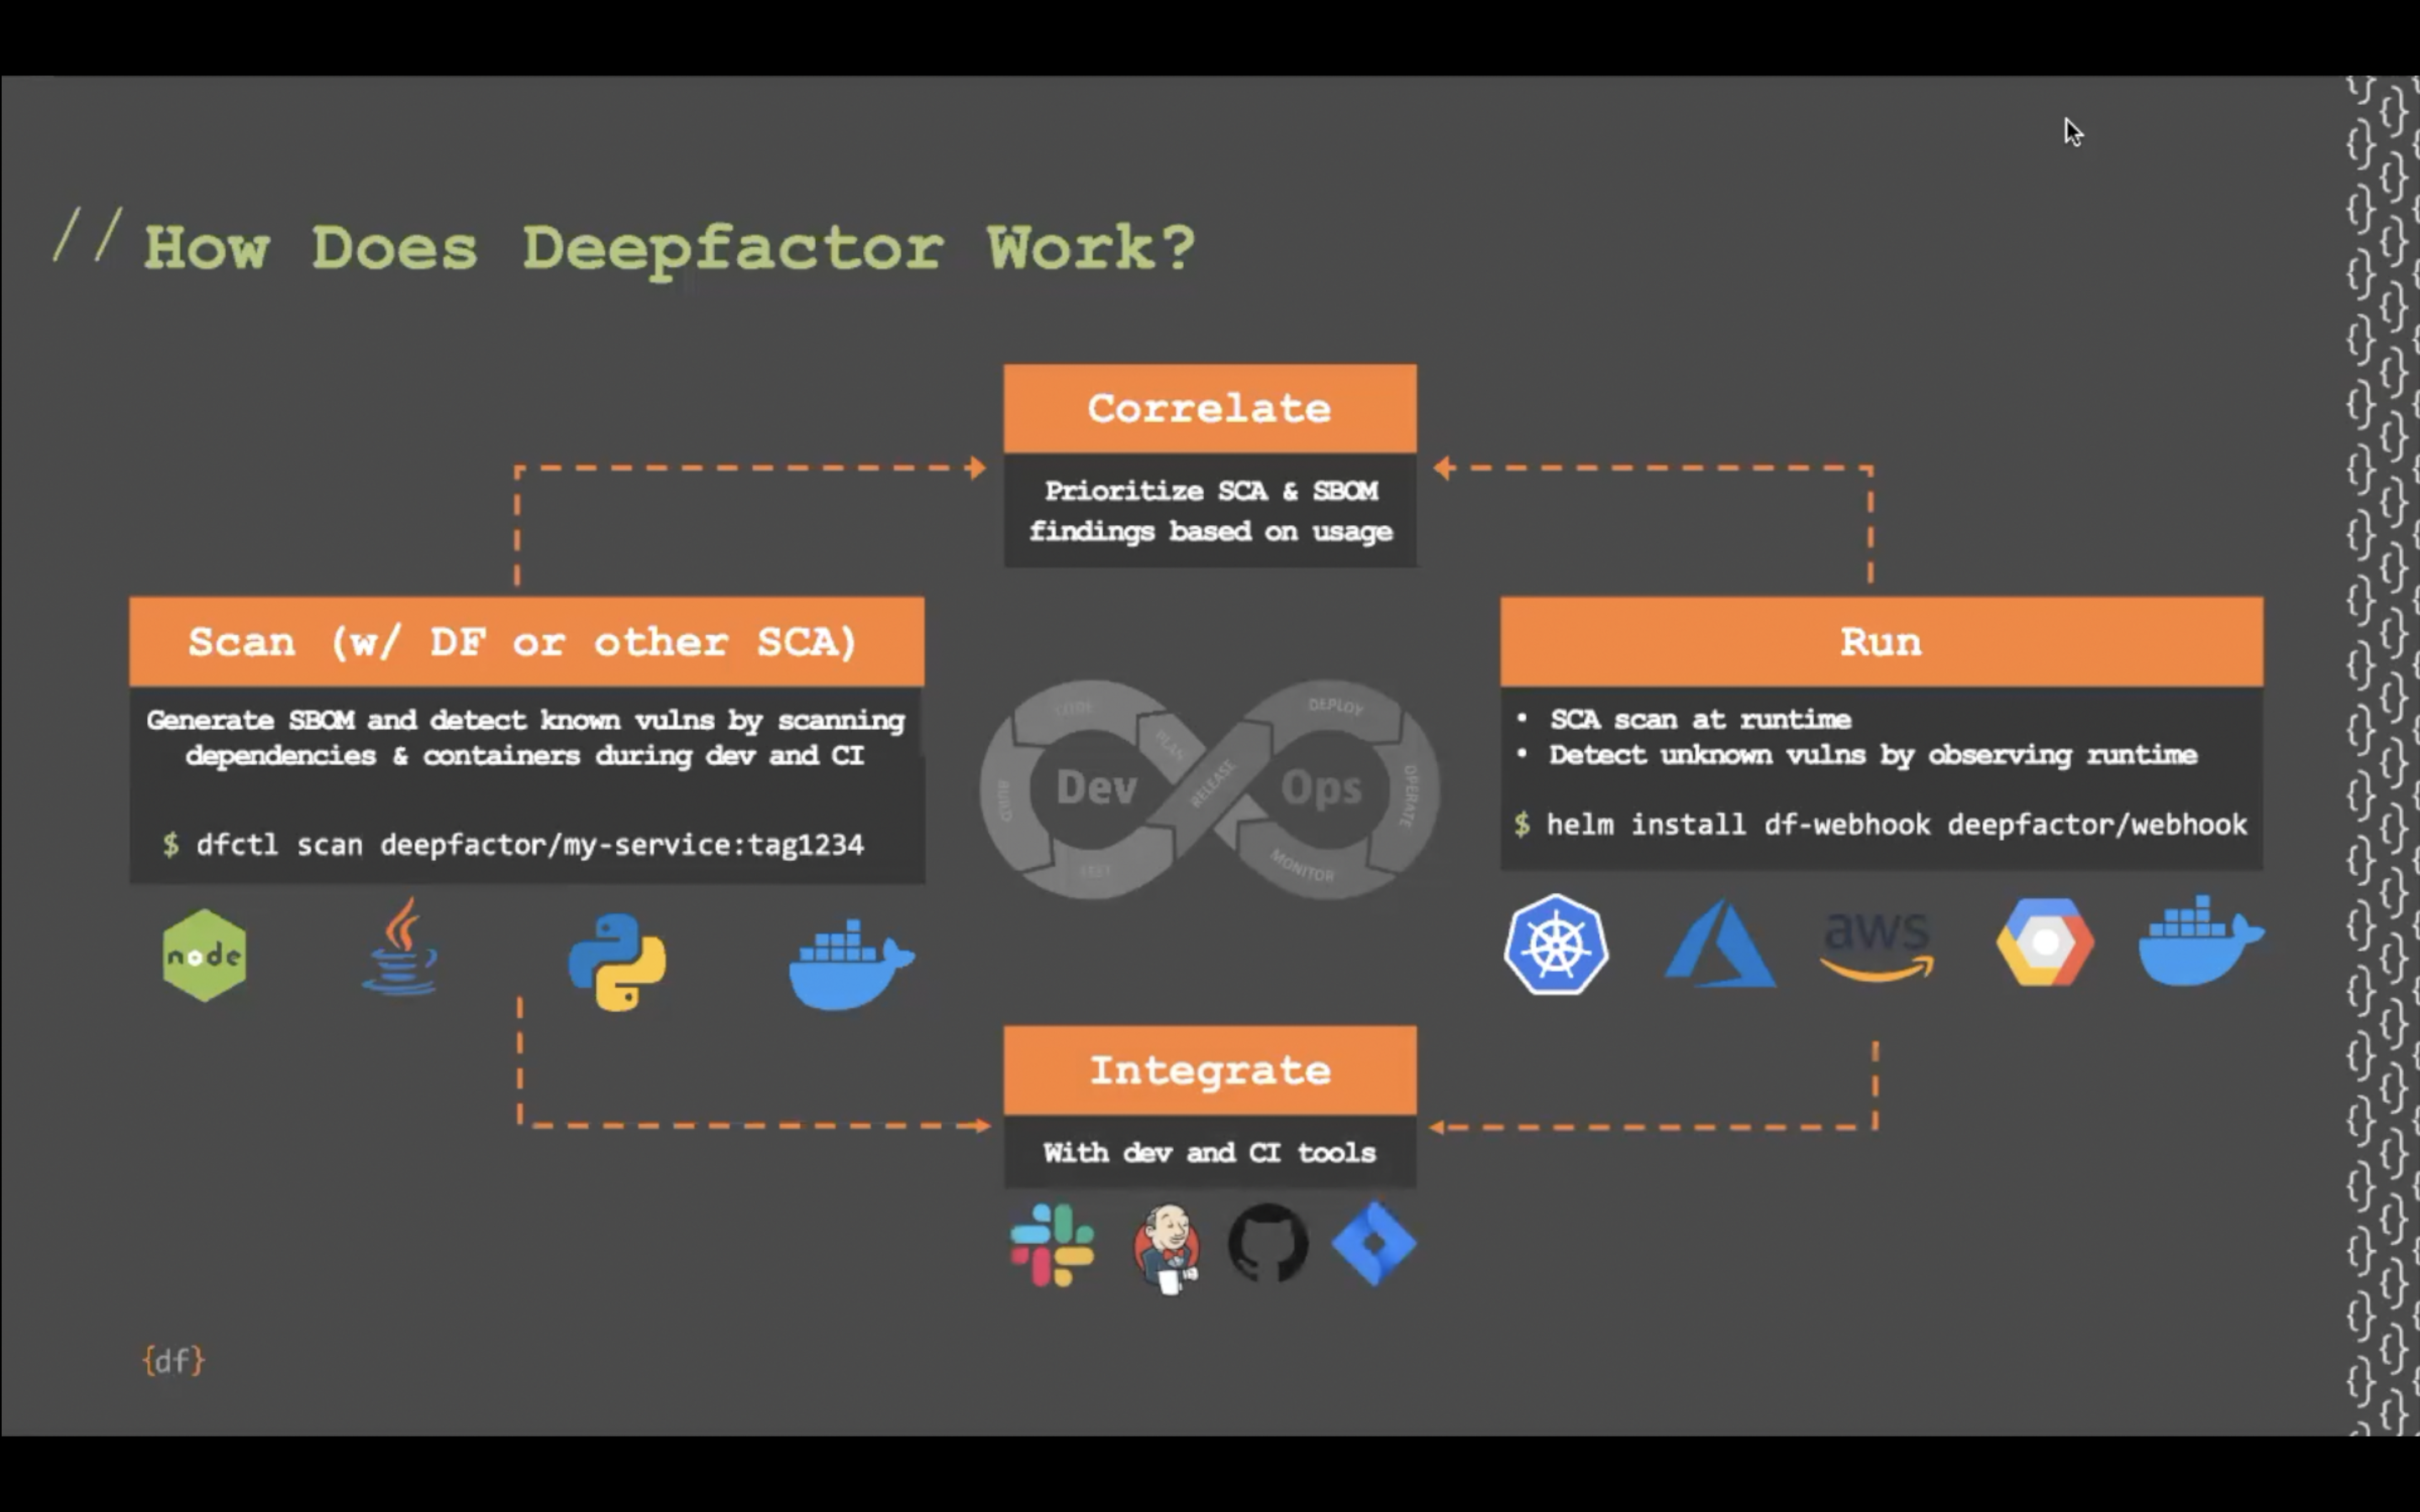
This article outlines the two different ways to run your application’s Docker containers with Deepfactor. If you are using Kubernetes to orchestrate and manage your Docker containers, please refer to this document.

  • Using the dfctl run Command
  • Adding Deepfactor to your container image


Using the dfctl run Command #

This method involves no changes to your container image. It is ideal for environments where a user prefers to keep the container image unchanged from QA/staging to production. Instead of using “docker run” to launch your container, you will use the “dfctl run” command. The advantage with this method is that you don’t need to modify your docker images to instrument them with Deepfactor.

Step 1: Download the Deepfactor docker volume initialization script. #

curl https://repo.deepfactor.io/install-dfctl.sh | sh -


The above script installs the “deepfactor-runtime” package for your Linux distribution. If the package is already installed, the script will update the package to the latest version. If your machine is a docker host, then the script also creates a docker volume with the name “df-runtime” and copies over the Deepfactor runtime artifacts to this docker volume. If you clean the docker volumes on the host using the “docker volume prune” command, you will need to re-run this script to re-create the df-runtime docker volume before running any of your containers with Deepfactor.

Step 2: Set your auth token #

export DF_RUN_TOKEN=<YOUR_DEEPFACTOR_TOKEN>

This token is needed to register your component and send telemetry to the Deepfactor Portal. You can get this token from the Deepfactor Portal UI. On the dashboard screen click on ‘Run with Deepfactor’ button on the right top.

Step 3: Run your docker container with Deepfactor #

dfctl run -a "my application" -v --docker-run DOCKER_RUN_OPTIONS --image IMAGE:1.1


  • -a or –application (required) specify the name of your application
  • –docker-run (required) specify the full docker run command along with arguments you use to run your container. The docker run parameters must identify the container image with –image. Command arguments may follow after the image name.
  • -c or –component (optional) specify the name of your component. Defaults to APP_IMAGE without tag
  • –version (optional) specify the version of the component you are currently running. You can filter insights based on this version number from the UI. Defaults to APP_IMAGE tag
  • -p or –policy (optional) specify the alert policy for this component. This policy will be used to raise alerts for all active and future instances of this component.
  • –disable-stack-traces (optional) – This option is to disable stack traces. Stack traces are enabled by default.
  • –disable-usage-tracking (optional) For java applications, Deepfactor injects a jvmti agent to intercept class loaded events and provides the list of classes used within each jar. You can disable this intercept by passing this option. Usage tracking for other programming language dependencies is always enabled irrespective of this option as it doesn’t add any additional overhead.
  • -E or –env (optional) specify the environment in which you are running your component (Ex. staging, qa etc.). You can filter insights based on the environment you specify.

The above command mounts the df-runtime docker volume to the /opt/deepfactor directory in your container.

Note:

1. Please ensure you add –image before your image name.

2. Running docker image requires privileges. Hence you will have to run this command as a member of the docker group, as root or with sudo.  Use the -E option with sudo to preserve the environment variable DF_RUN_TOKEN for registration with the Deepfactor portal.

3. Applications could see a performance impact when run with Deepfactor since stack traces are enabled by default.

Adding Deepfactor to your container image #

This method involves incorporating Deepfactor’s instrumentation library into the container image itself. This method is ideal for environments where a user wishes not to change his / her deployment command or install dfctl on the deployment machine. In this method, we take your docker image, add runtime support libraries (libdf.so) and create a new image. During deployment, you must use this newly created image with Deepfactor enabled instead of the original image. One advantage of this approach is that your deployment scripts/pipeline don’t need to change.

Step 1: Download Deepfactor Dockerfile #

  1. Login to your Deepfactor Portal.
  2. Click on Run with Deepfactor.
  3. In the left sidebar, click on the Other Container Deployments option.
  4. Click the Download button to download the Docker file.


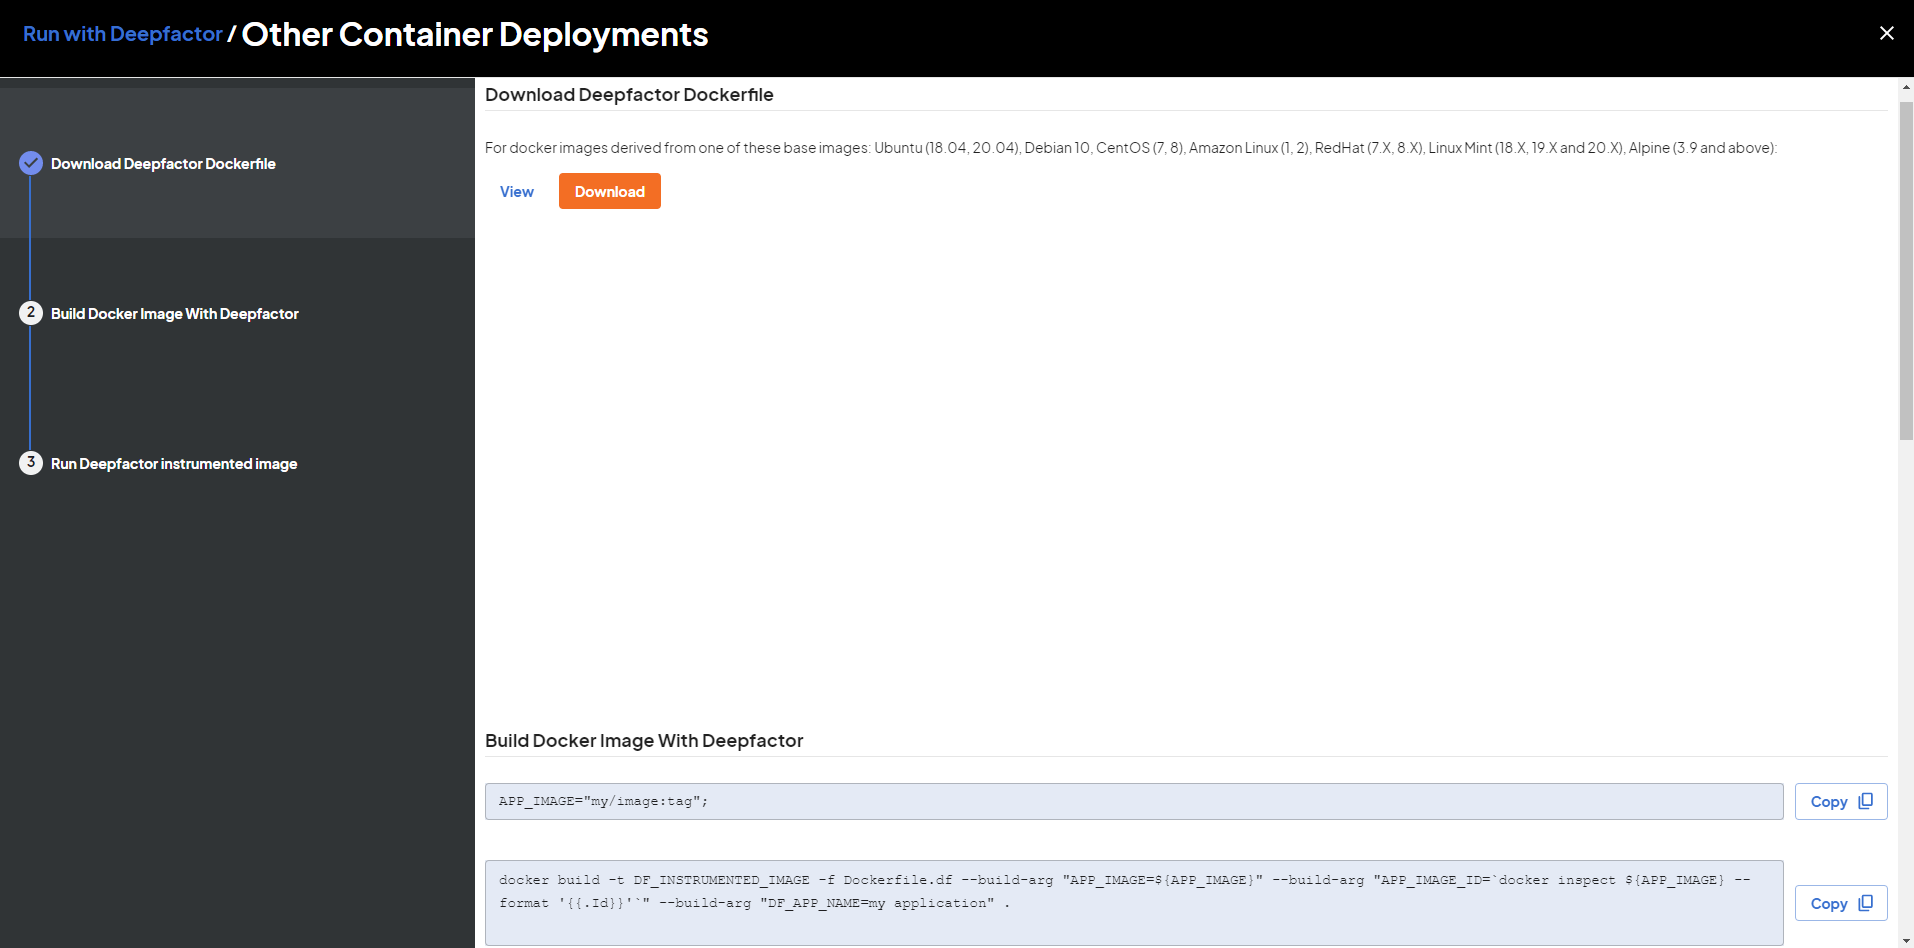
This Dockerfile.df will run a multi-stage build to create a new image from your Docker image with runtime libraries included in /opt/Deepfactor.

Step 2: Build Docker Image With Deepfactor  #

APP_IMAGE="my/image:tag";
docker pull ${APP_IMAGE}
docker build --no-cache -t DF_INSTRUMENTED_IMAGE -f Dockerfile.df \
    --build-arg "APP_IMAGE=${APP_IMAGE}" \
    --build-arg "APP_IMAGE_ID=`docker inspect ${APP_IMAGE} --format '{{.Id}}'`" \
    --build-arg "DF_APP_NAME=my application" .


Note: You need to pull the application image first so that image id can be retrieved and passed in the succeeding docker build command.

In this step, we use the Dockerfile downloaded in Step 1 to create the new image with Deepfactor runtime included.

  • APP_IMAGE is the name of the docker image, generally of the form [registry][:port]/[image_path][:tag] you want to instrument with Deepfactor
  • DF_APP_NAME (required) specify the name of your application
  • DF_INSTRUMENTED_IMAGE: name of the instrumented docker image. You have to deploy this image as part of your deployment pipeline.
  • APP_IMAGE_ID: This is the image SHA of the uninstrumented image. This argument is required to correlate scan results with runtime results.

Options:

  • –build-arg “DF_COMPONENT=”:(optional) This is the name of your component. Defaults to APP_IMAGE without tag
  • –build-arg “DF_COMPONENT_VERSION=”:(optional) This is the version of your component. Defaults to APP_IMAGE tag
  • –build-arg “DF_STACK_TRACES=disable”: (optional) Stack traces are enabled by default. This option is to disable stack traces.
  • –build-arg “DF_USAGE_TRACKING=disable” (optional) For java applications, Deepfactor injects a jvmti agent to intercept class loaded events and provides the list of classes used within each jar. You can disable this intercept by passing this option. Usage tracking for other programming language dependencies is always enabled irrespective of this option as it doesn’t add any additional overhead.
  • –build-arg “DF_ENV_NAME=”:(optional) specify the environment in which you are running your component (Ex. staging, qa etc.). You can filter insights based on the environment you specify.
  • –build-arg “DF_ALERT_POLICY=”:(optional) Please enter the name of the alert policy. If not set, the default policy will be used to generate alerts.

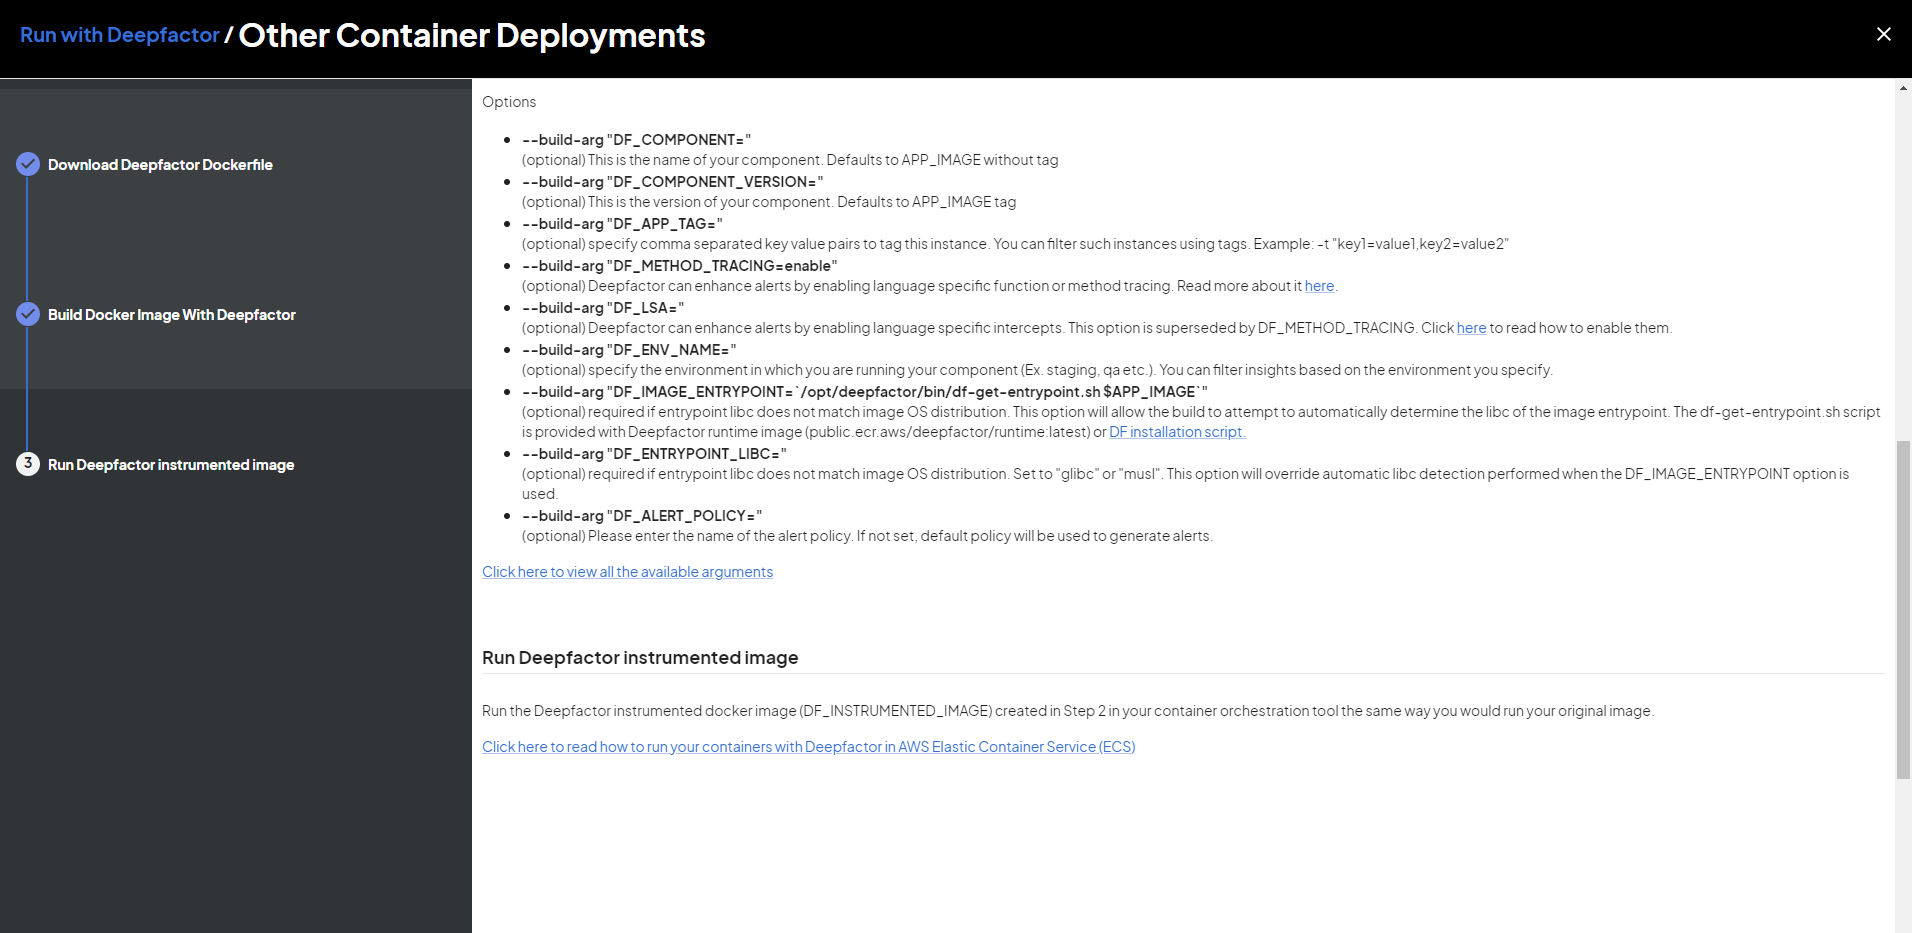
Note: We recommend scanning the uninstrumented container image with Deepfactor scanner which will generate SBOM and find SCA vulnerabilities. Deepfactor will automatically correlate these findings with your running application and show a combined view on the portal UI. Refer to dfctl scan document for how to scan your image with Deepfactor.


Step 3: Run the Deepfactor enabled Docker image #

docker run DF_INSTRUMENTED_IMAGE

Where:

  • DF_INSTRUMENTED_IMAGE is the name of the Deepfactor instrumented docker image

Use the same command as you would to run your original docker container, but use the Deepfactor enabled docker image we created in Step 2.

Note: Applications could see a performance impact when run with Deepfactor since stack traces are enabled by default.

Was this article helpful?
Still stuck? How can we help?

How can we help?

Updated on December 15, 2023

Powered by BetterDocs

Table of Contents
  • Using the dfctl run Command
    • Step 1: Download the Deepfactor docker volume initialization script.
    • Step 2: Set your auth token
    • Step 3: Run your docker container with Deepfactor
  • Adding Deepfactor to your container image
    • Step 1: Download Deepfactor Dockerfile
    • Step 2: Build Docker Image With Deepfactor 
    • Step 3: Run the Deepfactor enabled Docker image
Deepfactor Icon

Deepfactor is a next-gen application security platform, using static container scan data + runtime analysis to prioritize vulnerabilities to those representing true risk to a business—based on reachability, runtime usage, deployment context, and exploit maturity.

Product Pricing Resources Company Documentation Login

SUBSCRIBE TO OUR NEWSLETTER!

Sign Up
LinkedIn Icon YouTube Icon GitHub Icon Twitter Icon

© 2025 Deepfactor, Inc. All Rights Reserved.

Privacy Statement | Terms of Service | Open Source Disclosure