This document will describe the steps needed to install the Deepfactor mutating admission webhook using Argo CD with vault plugin.
1. Enable vault plugin in Argo CD installation #
If you have already enabled vault plugin in your Argo CD installation, you can skip this step. If you are performing a fresh install, you can use the following steps to install Argo CD with vault plugin. We will install using the official vault helm chart.
Create a yaml file (argocd.yaml) with the below contents.
## Repo Server
  repoServer:
    # -- Environment variables to pass to repo server
    env:
    - name: AVP_TYPE
      value: vault
      # Edit if we need to do so. This is the vault svc url.
    - name: VAULT_ADDR
      value: http://vault.vault:8200
    - name: AVP_AUTH_TYPE
      value: k8s
      # Using this role we should be able to pull data from vault
    - name: AVP_K8S_ROLE
      value: argocd
    # -- Additional volumeMounts to the repo server main container
    volumeMounts:
    - name: custom-tools
      mountPath: /usr/local/bin/argocd-vault-plugin
      subPath: argocd-vault-plugin
    # -- Additional volumes to the repo server pod
    volumes:
    - name: custom-tools
      emptyDir: {}

    # -- Init containers to add to the repo server pods
    initContainers:
    - name: download-tools
      image: alpine:3.8
      command: [sh, -c]
      env:
      - name: AVP_VERSION
        value: "1.4.0"
      args:
      - >-
        wget -O argocd-vault-plugin
        https://github.com/argoproj-labs/argocd-vault-plugin/releases/download/v${AVP_VERSION}/argocd-vault-plugin_${AVP_VERSION}_linux_amd64 &&
        chmod +x argocd-vault-plugin &&
        mv argocd-vault-plugin /custom-tools/
      volumeMounts:
      - mountPath: /custom-tools
        name: custom-tools

  server:
    config:
      configManagementPlugins: |
        - name: argocd-vault
          generate:
            command: [argocd-vault-plugin]
            args:
              - generate
              - ./
        - name: argocd-vault-helm
          generate:
            command: [sh, -c]
            args:
              - |
                helm template $ARGOCD_APP_NAME ${helm_args} -n $ARGOCD_APP_NAMESPACE . |
                argocd-vault-plugin generate -
Install Argo CD with vault plugin using the following commands.
helm repo add argo https://argoproj.github.io/argo-helm
  helm repo update
  helm upgrade --install argocd argo/argo-cd -n argocd -f argocd.yaml --version=4.5.9 --create-namespace
2. Install vault in your kubernetes cluster #
If you have already installed vault, you can skip this step.
Create a yaml file (vault.yaml) with the following contents.
apiVersion: argoproj.io/v1alpha1
  kind: Application
  metadata:
    name: vault
    namespace: argocd
  spec:
    ignoreDifferences:
    - group: admissionregistration.k8s.io
      kind: MutatingWebhookConfiguration
      jqPathExpressions:
      - .webhooks[]?.clientConfig.caBundle
    destination:
      namespace: vault
      server: https://kubernetes.default.svc
    project: default
    source:
      repoURL: https://helm.releases.hashicorp.com
      chart: vault
      targetRevision: 0.15.0
      helm:
        releaseName: vault
    syncPolicy:
      automated: {}
      syncOptions:
      - CreateNamespace=true
Note: In the config above, we are specifying ‘vault’ as the namespace for vault installation.
Run the following command to create the Argo CD application for vault
kubectl apply -f ./vault.yaml
3. Configure vault and add Deepfactor portal secrets #
If vault is sealed then you will first need to unseal it so you can enable kubernetes auth and add Deepfactor secrets to vault. Please following the below steps to unseal.
# Find the name of the vault service
  kubectl get svc -n vault
Port forward vault port to local host so you can access it on the local machine. Please replace vault-service-name with the service name shown in the output of step 1
kubectl -n vault port-forward svc/vault-service-name 8200
Run the following commands to unseal vault
# The following commands assume you have vault installed on the local machine

  export VAULT_ADDR='http://127.0.0.1:8200'
  # The following command will display 6 tokens. These will be required for future use
  vault operator init

  # You will need to run the unseal command thrice and provide 3 different tokens
  # apart from the initial root token
  vault operator unseal
  vault operator unseal
  vault operator unseal
Now that you have unsealed vault, you can enable kubernetes auth in vault. In order to do this, you will need to exec into the vault pod and run the following commands
# Find the vault pod name
  kubectl get pods -n vault
  # Replace the vault-pod-name with the one shown in the output of the previous command
  kubectl exec -n vault -it vault-pod-name -- /bin/sh

  # Run the following commands within the vault pod
  vault login
  vault auth enable kubernetes
  vault write auth/kubernetes/config
      kubernetes_host="https://$KUBERNETES_PORT_443_TCP_ADDR:443"
      disable_iss_validation=true
  exit
Ensure you are still port forwarding from vault service to localhost and run the following commands.
vault login
  # When prompted, enter the initial root token

  # Create a role and policy to allow Argo CD to access vault
  vault policy write deepfactor-secret-reader - <<EOF
  path "internal/data/database/config/deepfactor/*" {
    capabilities = ["read"]
  }
  EOF

  # argocd-repo-server is the service account name
  # argocd is the namespace
  vault write auth/kubernetes/role/argocd
      bound_service_account_names=argocd-repo-server
      bound_service_account_namespaces=argocd
      policies=deepfactor-secret-reader
      ttl=0
  # If secret kv-v2 engine is not enabled then enable it at path internal
  vault secrets enable -path=internal kv-v2

  # Create secrets for portal and database passwords
  # Enter strong passwords for strong-portalpwd, strong-clickpwd, strong-pgpwd, strong-jwt
  vault kv put internal/database/config/deepfactor/portal portalpassword="strong-portalpwd"
      clickhousepassword="strong-clickpwd"
      postgrespassword="strong-pgpwd"
      jwtkey="strong-jwt"
      portaltoken="portal_token_obtained_from_my.deepfactor.io"
      natstoken="strong-nats-token"
3. Install cert manager #
If you have already installed cert manager in your K8s cluster, you can skip this step. Create a yaml file (cert-manager.yaml) with the following contents.
apiVersion: argoproj.io/v1alpha1
  kind: Application
  metadata:
    name: cert-manager
    namespace: argocd
  spec:
    destination:
      namespace: cert-manager
      server: https://kubernetes.default.svc
    project: default
    source:
      chart: cert-manager
      helm:
        parameters:
        - name: installCRDs
          value: "true"
      repoURL: https://charts.jetstack.io
      targetRevision: v1.8.0
    syncPolicy:
      automated: {}
      syncOptions:
      - CreateNamespace=true
Run the following command to install
kubectl apply -f ./cert-manager.yaml
4. Install ingress controller #
If you have already installed an ingress-controller in your Kubernetes cluster, you can reuse that for Deepfactor portal. Please refer to the following article to view the steps.
Deepfactor Portal Installation with Existing Ingress Controller
If you have not installed an ingress controller, create a yaml file (ingress.yaml) with the following contents
apiVersion: argoproj.io/v1alpha1
  kind: Application
  metadata:
     name: ingress-nginx
     namespace: argocd
  spec:
    destination:
      namespace: ingress-nginx
      server: https://kubernetes.default.svc
    project: default
    source:
      chart: ingress-nginx
      helm:
        parameters:
        - name: tcp.13443
          value: "deepfactor/df-stable-nginx:13443"
      repoURL: https://kubernetes.github.io/ingress-nginx
      targetRevision: 4.1.2
    syncPolicy:
      automated: {}
      syncOptions:
      - CreateNamespace=true
Run the following command to create the Argo CD application for ingress-controller.
kubectl apply -f ./ingress.yaml
5. Install Deepfactor portal #
Create a yaml file (deepfactor-portal.yaml) with the following contents
apiVersion: argoproj.io/v1alpha1
  kind: Application
  metadata:
    name: df-stable
    namespace: argocd
  spec:
    ignoreDifferences:
    - group: admissionregistration.k8s.io
      kind: MutatingWebhookConfiguration
      jqPathExpressions:
      - .webhooks[]?.clientConfig.caBundle
    destination:
      namespace: deepfactor
      server: https://kubernetes.default.svc
    project: default
    source:
      repoURL: https://static.deepfactor.io/helm-charts
      chart: deepfactor
      targetRevision: 2.4.60
      plugin:
        name: argocd-vault-helm
        env:
          # These are the arguments we pass to "helm template"
          - name: helm_args
            value: |
              --dependency-update
              --set dfstartup.config.emailID=portal_admin_email_address
              --set dfstartup.config.firstName=portal_admin_first_name
              --set dfstartup.config.lastName=portal_admin_last_name
              --set dfstartup.config.password=<path:internal/data/database/config/deepfactor/portal#portalpassword>
              --set dfstartup.config.portalToken=<path:internal/data/database/config/deepfactor/portal#portaltoken>
              --set clickhouse.password=<path:internal/data/database/config/deepfactor/portal#clickhousepassword>
              --set postgres.password=<path:internal/data/database/config/deepfactor/portal#postgrespassword>
              --set appsettings.jwt=<path:internal/data/database/config/deepfactor/portal#jwtkey>
              --set nats.auth.token=<path:internal/data/database/config/deepfactor/portal#natstokentoken>
              --set ingress-nginx.enablemodule=false
              --set ingress.hostName=your_preferred_portal_hostname
              --set ingress.certManager.enabled=true
              --set nginx.ingress.className=nginx
    syncPolicy:
      automated: {}
      syncOptions:
      - CreateNamespace=true
Note: Deepfactor portal pods will be installed in the ‘deepfactor’ namespace.
Please enter appropriate values for the following in the above yaml file
portal_admin_email_address: This is the email address you will use to login to the portal once it is installed
portal_admin_first_name: First name of the admin user
portal_admin_last_name: Last name of the admin user
your_preferred_portal_hostname: The hostname you would like the Deepfactor portal to use. Please note, you will need to create a DNS entry for this hostname to ensure applications running with Deepfactor can reach the portal.
Run the following command to create the Argo CD application for Deepfactor portal
kubectl apply -f ./deepfactor-portal.yaml
Verify that the Deepfactor portal pods are up by running the following command
kubectl get pods -n deepfactor
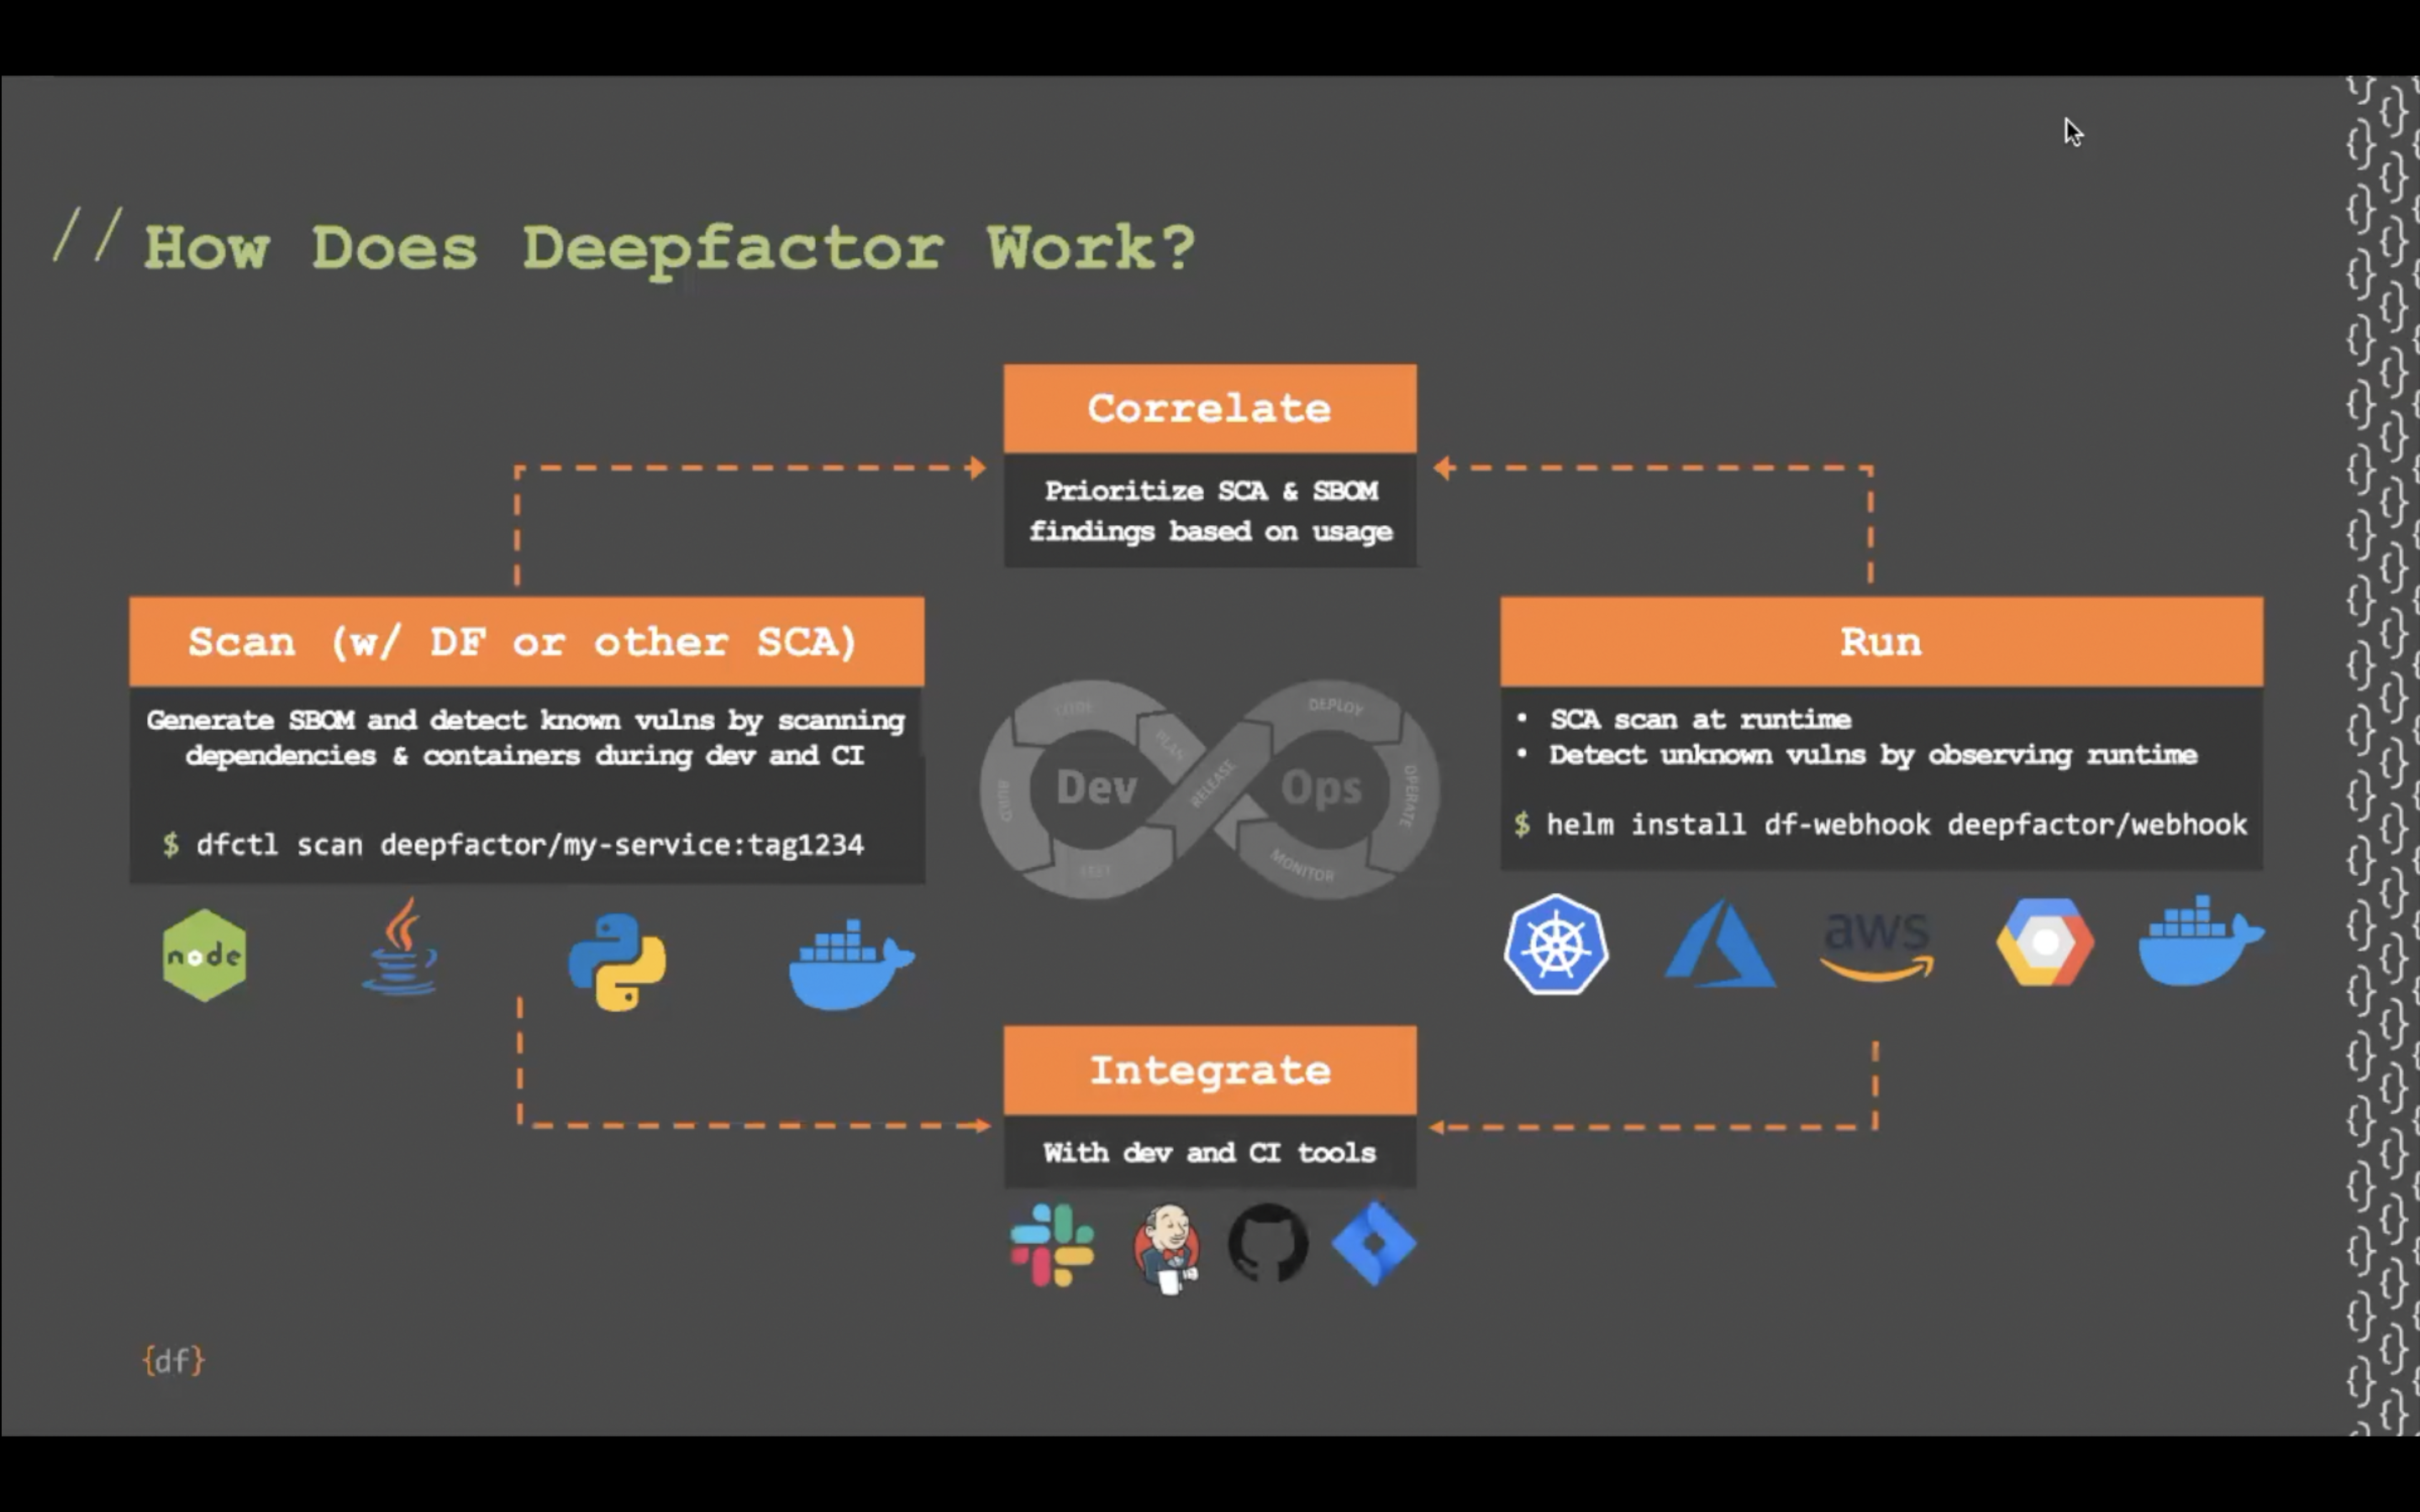
6. Install Deepfactor mutating admission webhook #
Once you have successfully installed the Deepfactor portal, you can install the mutating admission webhook controller to instrument your kubernetes workload with Deepfactor.
Login to the Deepfactor portal UI and retrieve the run token from the ‘Run with Deepfactor’ screen instructions.
In this step, you will create a secret in vault for this run token.
As mentioned above, port forward from vault to localhost and run the following commands.
vault login
  # When prompted, enter the initial root token

  # Create a secret for Deepfactor run token
  vault kv put internal/database/config/deepfactor/webhook runtoken="token_obtained_from_deepfactor_portal_ui"
Create a yaml file (df-webhook.yaml) with the following contents.
Note: The webhookconfig shown below is only an example. For guidance on how to create a webhookconfig for your environment, please refer to the following document
Configure Deepfactor Mutating Webhook
apiVersion: argoproj.io/v1alpha1
  kind: Application
  metadata:
    name: df-webhook-stable
    namespace: argocd
  spec:
    ignoreDifferences:
    - group: admissionregistration.k8s.io
      kind: MutatingWebhookConfiguration
      jqPathExpressions:
      - .webhooks[]?.clientConfig.caBundle
    destination:
      namespace: df-webhook
      server: https://kubernetes.default.svc
    project: default
    source:
      repoURL: https://static.deepfactor.io/helm-charts
      chart: webhook
      targetRevision: 2.4.47
      plugin:
        name: argocd-vault-helm
        env:
          # These are the arguments we pass to "helm template"
          - name: helm_args
            value: |
              --dependency-update
              --set clusterName=clusterNameOfYourChoice # provide a name for your cluster
              --set webhook.certManager.enabled=true
              --set validation.enabled=true
              --set webhookconfig.dfRunToken=<path:internal/data/database/config/deepfactor/webhook#runtoken>
              --set webhookconfig.namespaces[0].name=default
              --set webhook.config.namespaceSelector.matchExpressions[0].key=kubernetes.io/metadata.name
              --set webhook.config.namespaceSelector.matchExpressions[0].operator=NotIn
              --set webhook.config.namespaceSelector.matchExpressions[0].values[0]=
              --set webhook.config.namespaceSelector.matchExpressions[1].key=control-plane
              --set webhook.config.namespaceSelector.matchExpressions[1].operator=DoesNotExist
    syncPolicy:
      automated: {}
      syncOptions:
      - CreateNamespace=true
Note: df-webhook is the namespace in which the admission webhook will be installed.
Run the following command to install Deepfactor webhook
kubectl apply -f ./df-webhook.yaml
Verify the webhook is successfully installed using the following command.
kubectl get pods -n df-webhook