The following article describes the steps required to use TLS certificate managed in AWS Certificate Manager (ACM) with Deepfactor portal installed using Cloudformation Template (CFT).
Step 1: Install Deepfactor portal using CFT #
Install Deepfactor portal using CFT downloaded from my.deepfactor.io. Please refer to the following document to view the steps required to install.
Deploying Deepfactor on AWS using CFT
Step 2: Add kube config for root user #
# ssh into the EC2 machine
ssh ubuntu@<ip_address_of_ec2_instance>
# run as root
sudo su
cd /microk8s/
mkdir ~/.kube
# add kube config for root user
microk8s config view > ~/.kube/config
Step 3: Update Deepfactor override.yaml #
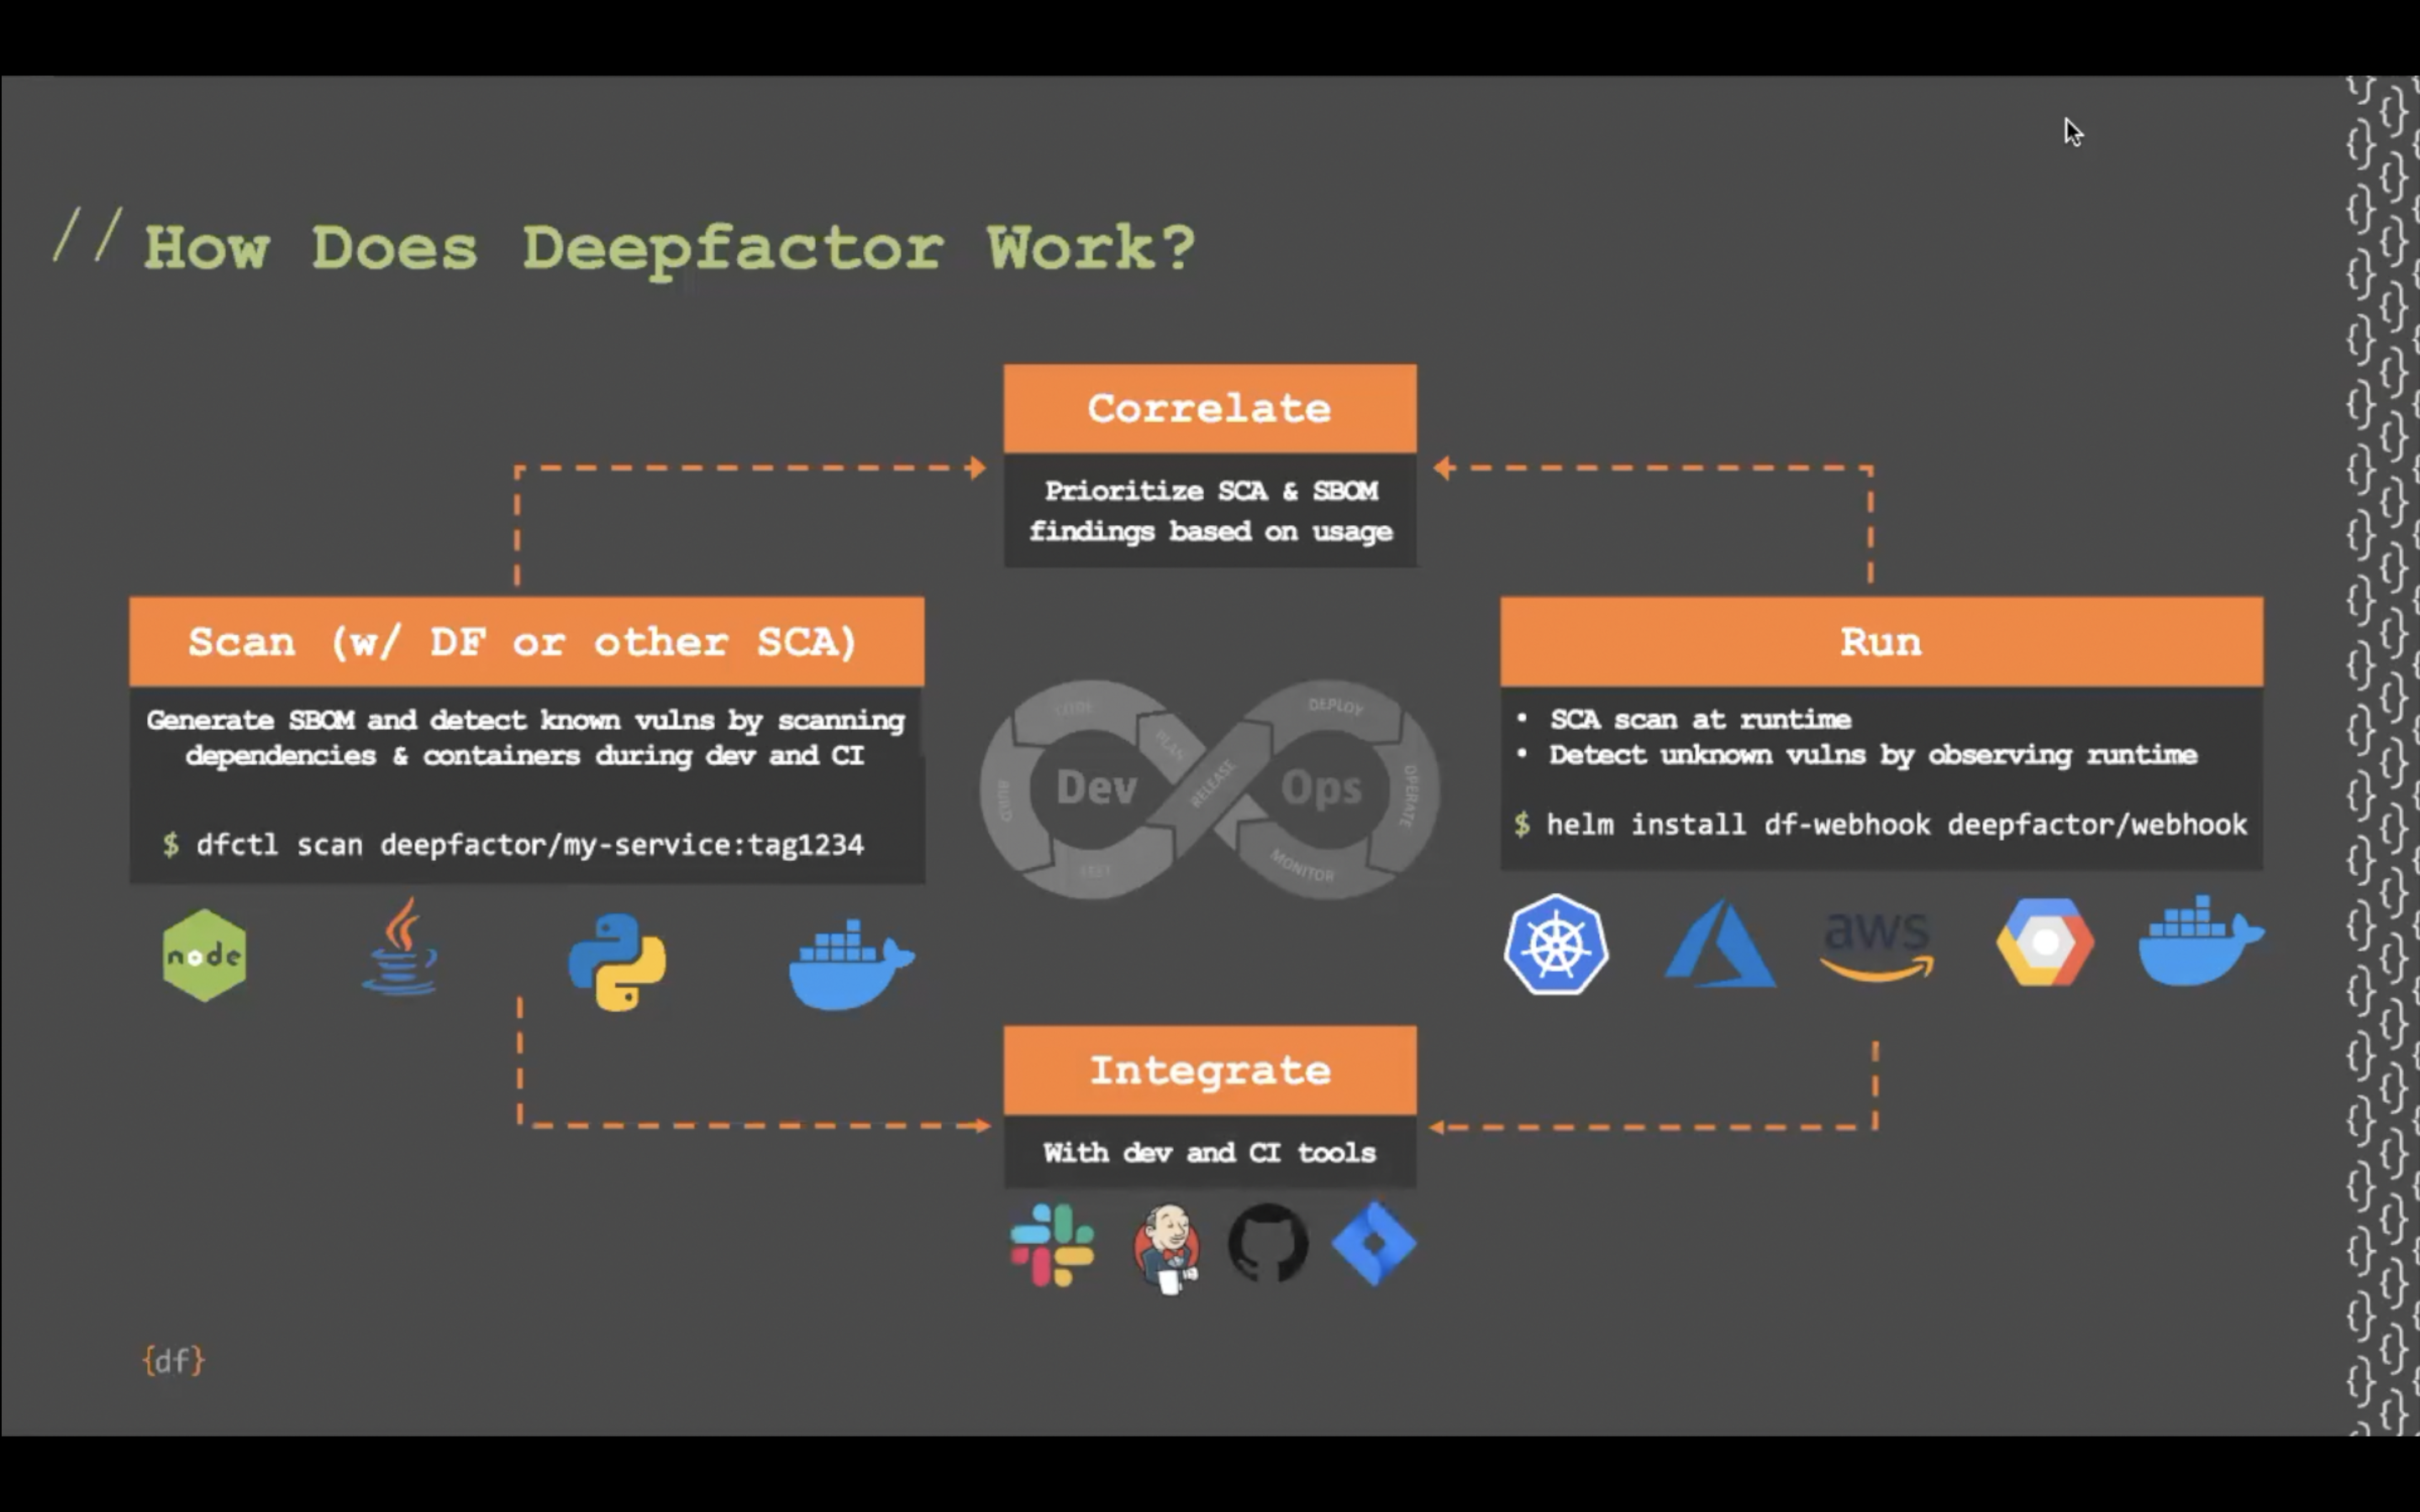
Make the following changes
- Disable TLS termination on Deepfactor nginx pod
- Run Deepfactor frontend service on port 80 (HTTP)
- Run Deepfactor proxy service (used for running DAST scans) on TCP port 13080.
Open override.yaml file present in /microk8s/ folder
vi /microk8s/override.yaml
Update the nginx block in the override.yaml as follows
nginx:
  hostNetwork: true
  ingress:
    enabled: false
  tls: false
  service:
    proxyPort: 13080
    servicePort: 80
Add apisvc block above nginx block in the override.yaml
apisvc:
  proxyPort: "13443"
The updated config should be as shown
apisvc:
  proxyPort: "13443"

nginx:
  hostNetwork: true
  ingress:
    enabled: false
  tls: false
  service:
    proxyPort: 13080
    servicePort: 80
Step 4: Delete TLS secret and root CA secret #
Since nginx pod on Deepfactor portal will not be terminating TLS, we can remove the TLS and root CA certificates
kubectl -n deepfactor delete secret df-certs-ingress deepfactor-certs
Step 5: Download root CA of your certificate and create a Kubernetes secret #
Depending upon the certificate provider you will need to download the root CA and create a kubernetes secret. This will be used to encrypt telemetry traffic between your applications and the Deepfactor portal.
For GoDaddy:
wget https://certs.godaddy.com/repository/gdroot-g2.crt
kubectl -n deepfactor create secret generic deepfactor-certs --from-file class="token operator">=portalca.crt class="token operator">=gdroot-g2.crt
For AWS public CA:
wget https://www.amazontrust.com/repository/AmazonRootCA1.pem
kubectl -n deepfactor create secret generic deepfactor-certs --from-file class="token operator">=portalca.crt class="token operator">=AmazonRootCA1.pem
For Let’s Encrypt:
wget https://letsencrypt.org/certs/isrgrootx1.pem
kubectl -n deepfactor create secret generic deepfactor-certs --from-file class="token operator">=portalca.crt class="token operator">=isrgrootx1.pem
Step 6: Update the Deepfactor deployment on your EC2 instance #
Use the following commands to update the Deepfactor Kubernetes helm chart on your EC2 instance
helm repo add deepfactor https://static.deepfactor.io/helm-charts
helm repo update
helm upgrade df-stable -n deepfactor deepfactor/deepfactor -f /microk8s/override.yaml
Step 7: Wait for Deepfactor pods to start with the new configuration #
Run the following command to check if all the pods in the deepfactor namespace are in the ‘running’ state
kubectl get pods -n deepfactor
Step 8: Allow incoming traffic on port 13080 and 80 on EC2 instance #
Clone the security group (sg-1) attached to the Deepfactor EC2 instance by selecting the security group on the EC2 dashboard and click on Actions -> Copy to new security group (sg-2).
Make the following changes to the cloned security group (sg-2).
- Remove port 13443 and 443 from inbound rules section
- Allow incoming traffic from the original security group (sg-1) on ports 80 and 13080 in the inbound rules section
Remove the original security group (sg-1) and attach the new security group (sg-2) to the Deepfactor EC2 instance. The original security group (sg-1) will be attached to the load balancer (created in the next step) so traffic from the load balancer will be allowed to the EC2 instance on ports 80 and 13080.
Step 9: Create a Classic Load Balancer on AWS #
Create a classic load balancer and use your certificate from AWS Certificate Manager (ACM).
Note: We use a classic load balancer because we need to allow traffic on 13443 port for running DAST scans over Deepfactor proxy.
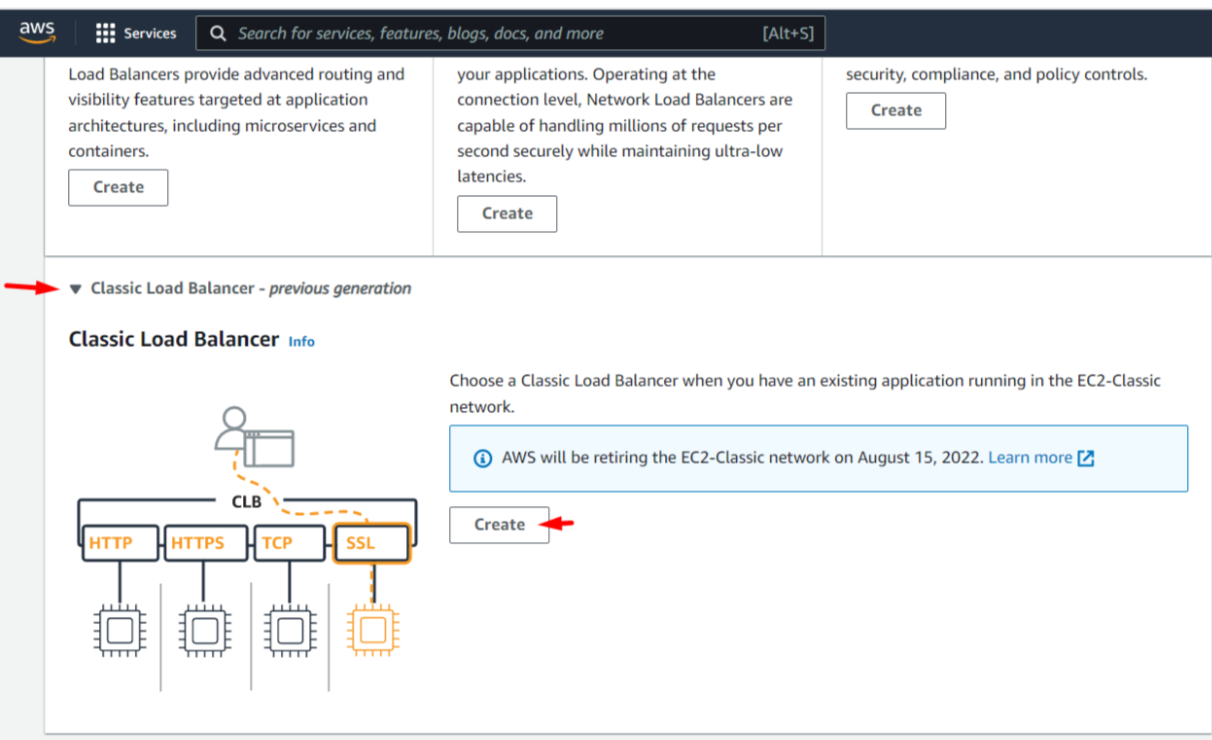
Define the load balancer configuration as shown in the screenshot. Please select the VPC you would like to install the load balancer in.
Note: If you are using a private VPC, please check the ‘Create an Internal load balancer’ checkbox.
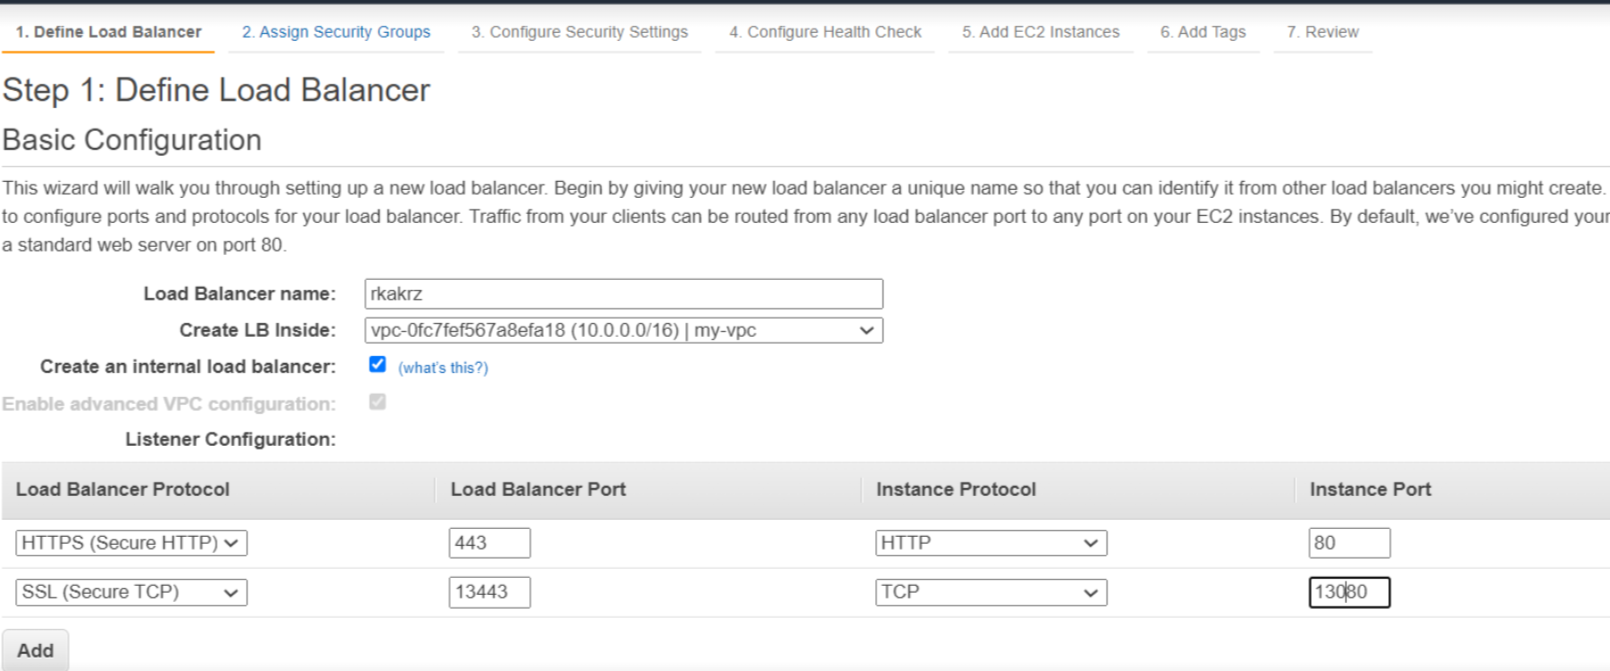
Attach the original security group (sg-1) to the classic load balancer. This security group will allow traffic on 13443 and 443 ports from your applications to the load balancer.
Step 10: Select the certificate from AWS Certificate Manager (ACM) #
This step assumes that you have already created a TLS certificate for the hostname assigned to the Deepfactor portal specified in the CFT parameters and imported it to AWS Certificate Manager (ACM).
Select the certificate from AWS Certificate Manager and attach it to the load balancer.

Step 11: Configure health check #
Configure health check as shown in the below screenshot

Add Deepfactor instance as a target for the load balancer.
Step 12: Add a DNS record for Deepfactor portal hostname on your Route 53 #
Create an ALIAS record for the hostname specified in Deepfactor CFT parameters and point it to the classic load balancer created above.
Now you can access the Deepfactor portal using the portal hostname specified in the CFT parameters. The traffic will be encrypted using the certificate from AWS Certificate Manager (ACM) and TLS termination will be done at the classic load balancer.