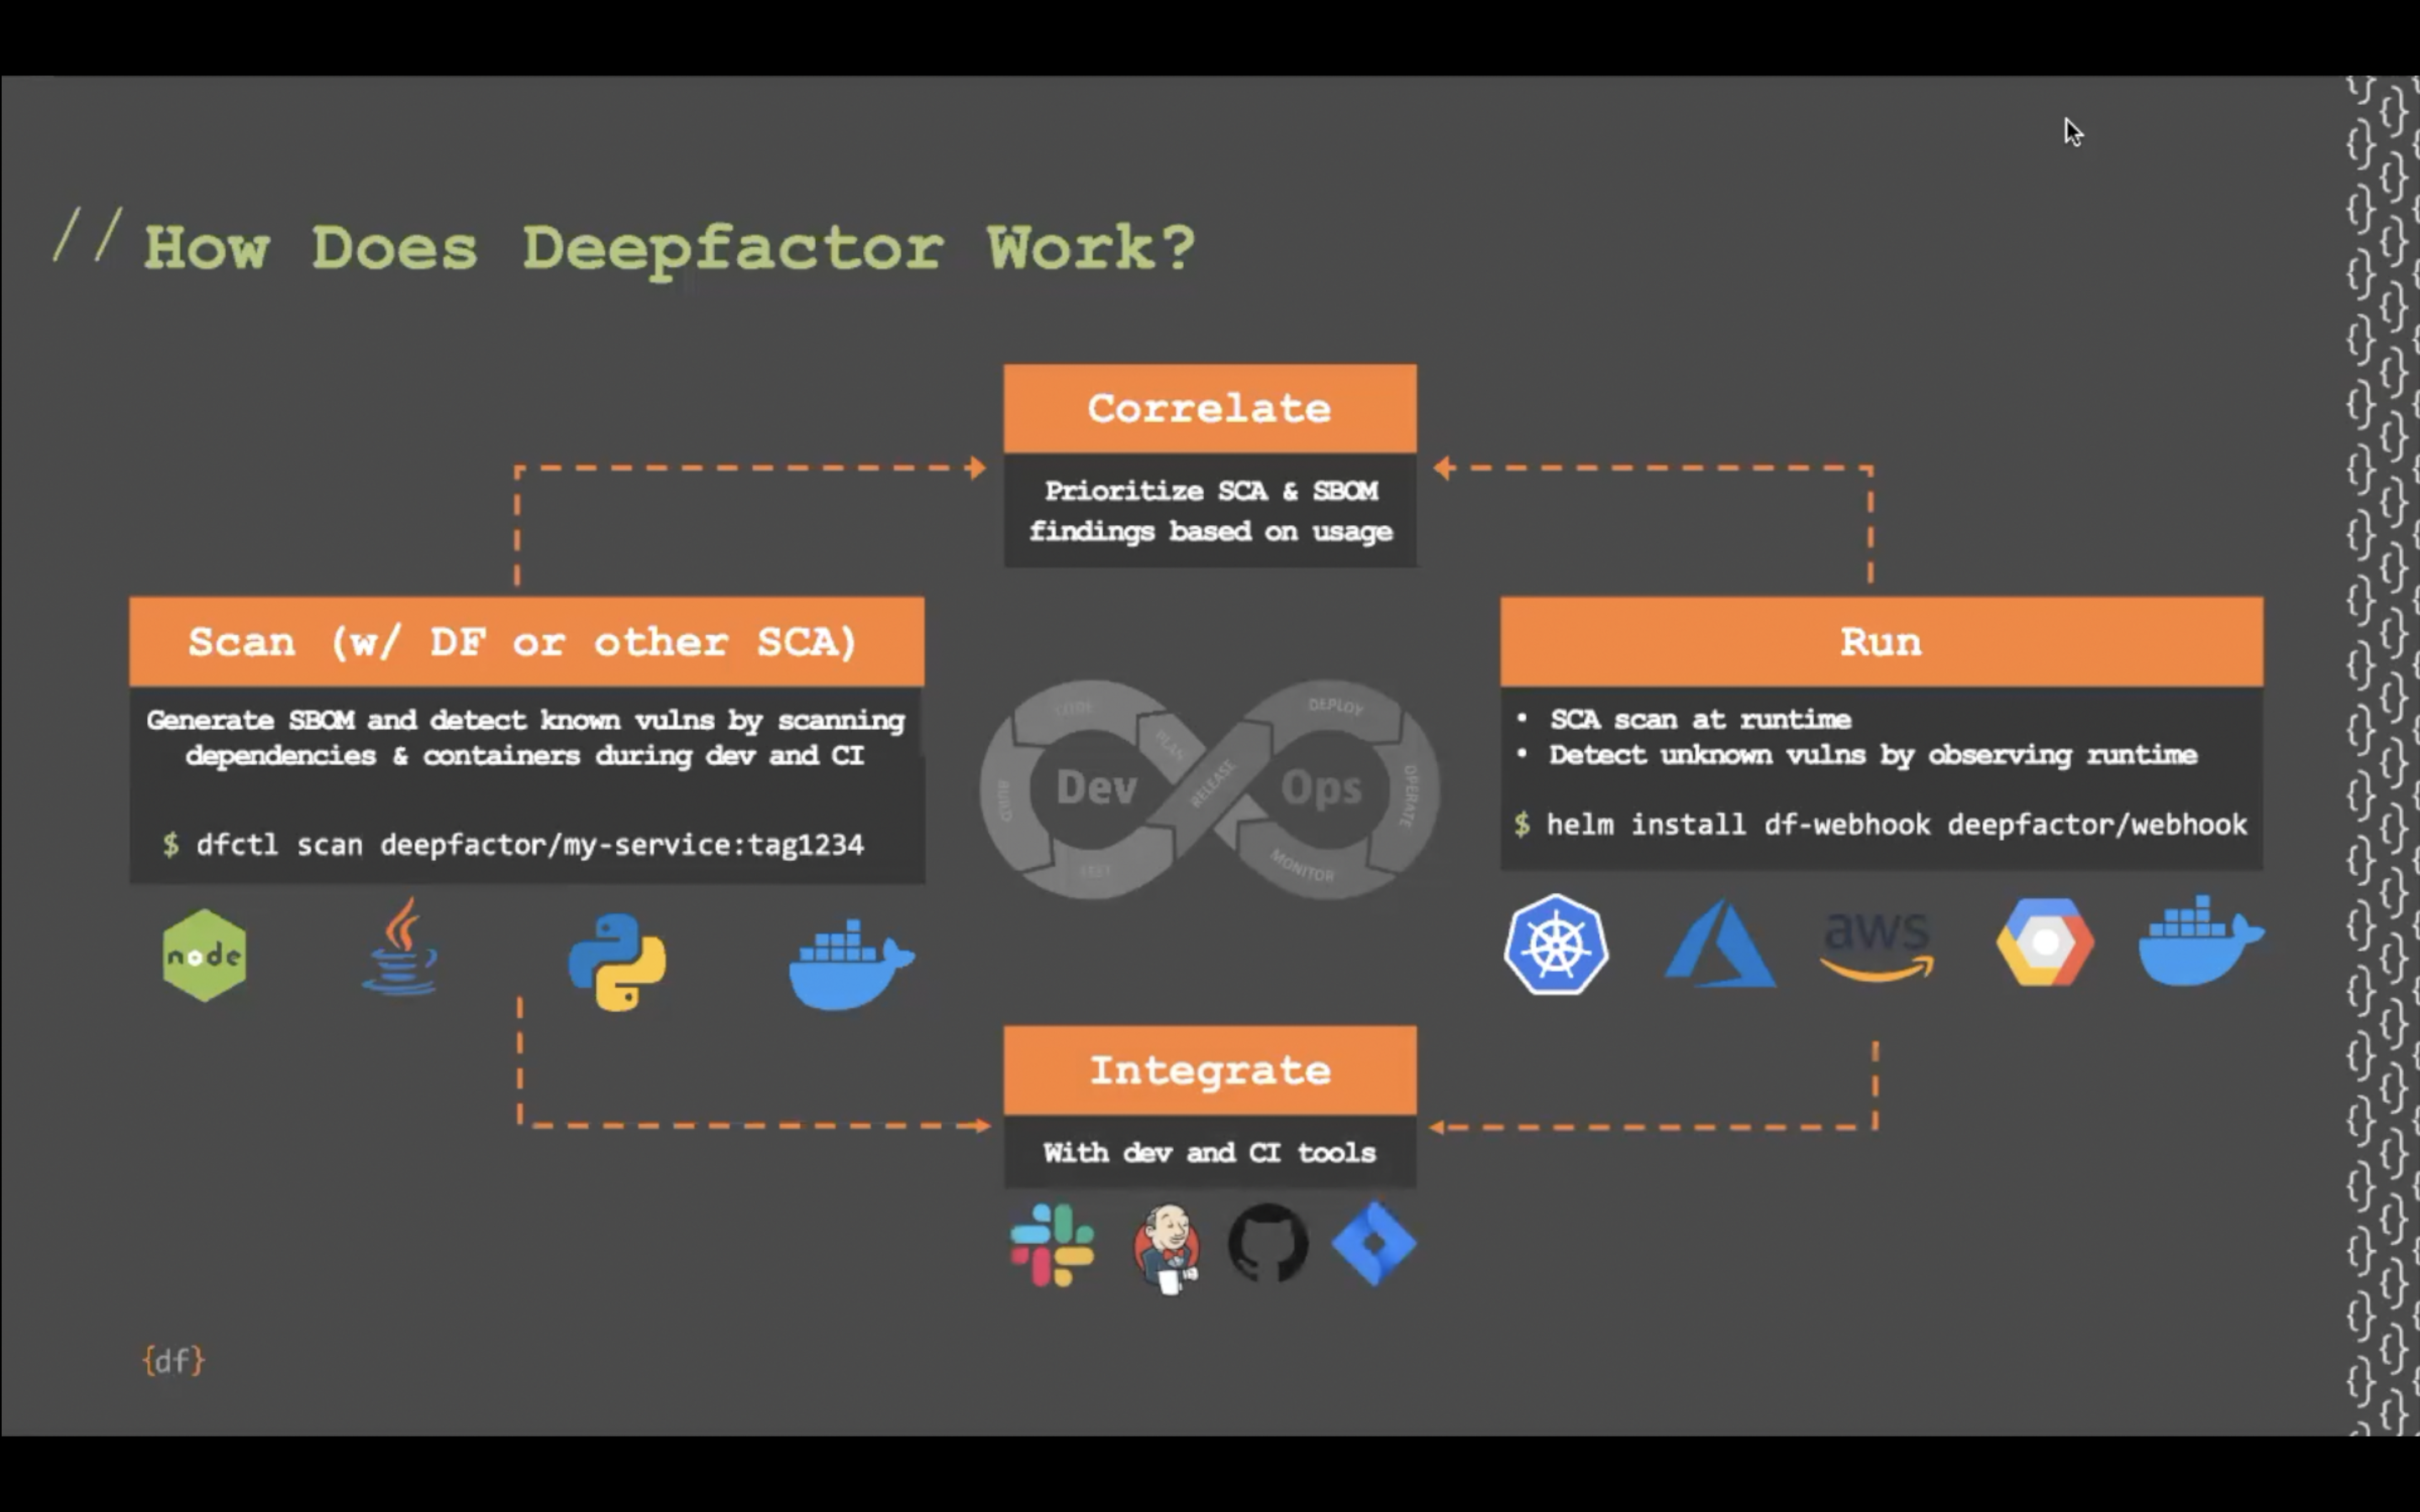
Deepfactor provides a command line utility dfctlas well as a container image with dfctl bundled in that can be integrated in the CI/CD pipeline to achieve the following use cases.
- Generate SBOM for your container images/source code
- Scan your container image/source code for vulnerabilities
- Gate builds if there is a violation of policy rules set by your organization
- Scan for every PR and reject if there is a policy violation
- View the trend of vulnerabilities across the different builds in a release.
The following document will describe the generic steps one needs to follow to integrate Deepfactor scanner in CI/CD pipelines. These steps should work for most CI/CD tools with some tool specific changes. The latter sections of this document provide example pipeline scripts for a few common scan scenarios in Jenkins and GitLab.
Deepfactor scanner image #
Deepfactor scanner image can be found at the following path:
public.ecr.aws/deepfactor/df/runtime:latest
We will be using this image in the later sections of this document where we explain how to launch a scan against your container image / file system.
Dfctl scan arguments #
The dfctl scan verb takes multiple arguments to help you customize the scan. The following table describes the various options. We will be using a combination of these options in the subsequent sections where we describe a few common scan use cases.
| Argument | Title | Description | Required |
|---|---|---|---|
| -s | Scan Artifact Type | Specify the scan artifact type. Allowed values are image, fs | No. Defaults to image |
| -a | Application Name | Specify the name of your application. This is required in the case of a file system scan. The artifact name will be applicationName:componentName on the portal UI | Required for filesystem scan only |
| -c | Component Name | Specify the name of your component. This is required in the case of a file system scan. The artifact name will be applicationName:componentName on the portal UI | Required for filesystem scan only |
| -V | Component Version | Specify the version of the component you are currently scanning. For container images, the image SHA is automatically considered as the version and you need not specify this argument. This argument is required only for filesystem scans. We recommend using a build number/identifier/version from your pipeline for this argument | Required for filesystem scan only |
| -u | Scan Timeout | You can optionally specify a timeout in minutes and the scan will be stopped when the timeout occurs. | No |
| -h | Agent Name | You can optionally provide a name for the scan agent. We recommend setting this to the name of the tool. Example: jenkins | No |
| -G | Scan Trigger Source | You can optionally provide scan trigger source. Ex. cli, ci/cd. | No |
| -p | Alert Policy | Specify the name of the scan alert policy for this scan. You can create custom policies from the Deepfactor portal UI to customize the alerts you receive. | No. Policy marked as default on the portal will be used for the scan if this argument is not specified |
| -f | Output Format | Specify the output formats you want as a comma-separated string. Allowed values are json, table, cyclonedx, spdx, spdx-json | No |
| -O | Output Filename | Specify output file path. If specified, the results of the scan will be stored in a file on the disk with this filename. The extension of the file will be decided based on the format. If multiple formats are selected, multiple output files will be stored to disk. | No |
| -X or –exit-code | Policy Violation Exit Code | Specify exit code that should be returned when any of the policy rules are violated. Default is set to 0. If you would like to gate builds based on exit gate, please set this to a non-zero value. Allowed values: 0 to 255 | No |
| -L or –failure-exit-code | Scan Failure Exit Code | Specify exit code that should be returned when there is an failure in scan. Default is set to 1. If you would like to ignore scan errors, then you can set this to 0. | No |
| -R | Release tag | Specify the name of the release to which this build belongs. Deepfactor will show the trend of vulnerabilities within a release and across releases. The release name is generally derived from the name of the branch of git tag depending upon your branching strategy | No |
| –include-dev-dependencies | Include dev dependencies | Specify this option to include dev dependencies for node.js (package-lock.json and yarn.lock) and PHP (composer-lock.json) in the scan output for filesystem scans. Please note, by default, Deepfactor filters out dev dependencies as they are generally not bundled into the artifact that runs in production and cause false positives/SBOM bloat. | No |
| Scan Artifact | Specify Image name/path or filesystem path to scan. | Yes |
#
Prerequisites #
- Ensure you have docker installed on the CI/CD agent where you intend to scan your artifact.
- Mount docker.sock to Deepfactor scan container so that the scanner can scan local images using the following option
-v /var/run/docker.sock:/var/run/docker.sock
Note: If you are running Jenkins as a Docker container (refer to  Docker ), ensure that you mount a file path for the Jenkins home directory using the following command:
--volume /var/jenkins_home:/var/jenkins_home
This step is necessary due to the way docker:dind works and is required if you intend to save the reports generated by dfctl scan.
Scanning artifacts #
Scanning artifacts using Deepfactor scanner involves two steps
1. Store Deepfactor run token as a secret in your CI/CD tool #
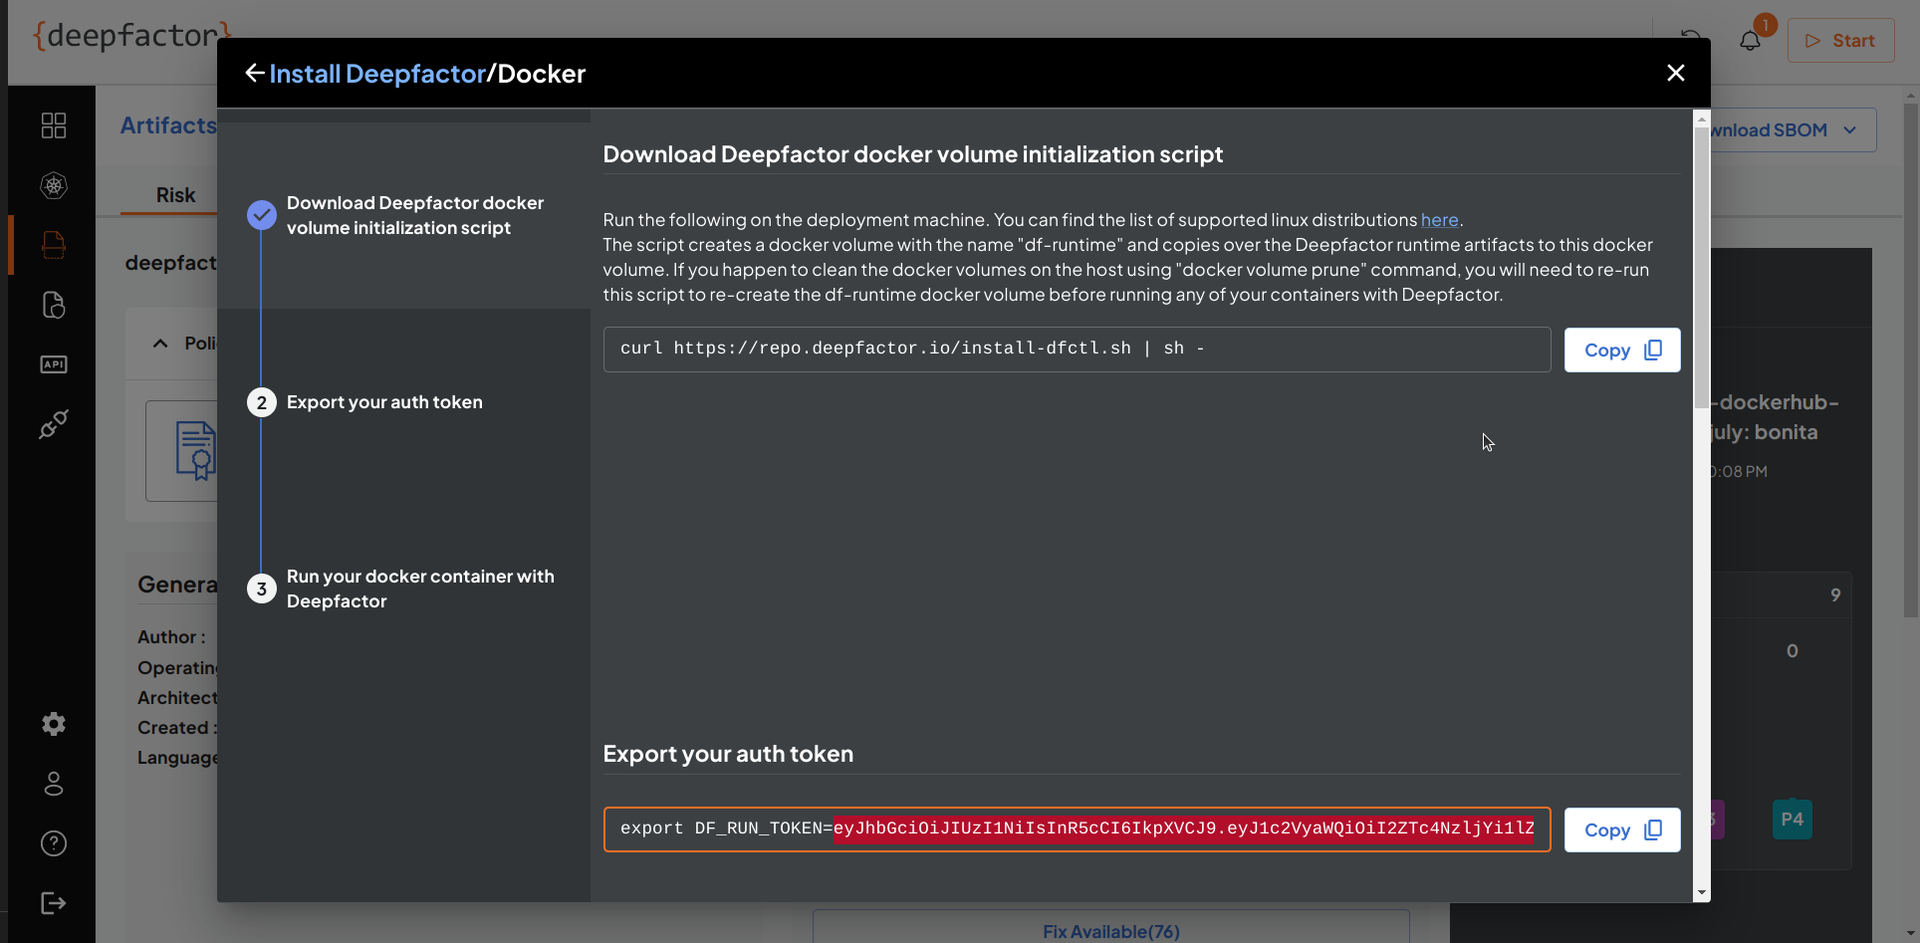
Once you setup the Deepfactor portal, you can get the Deepfactor run token from the portal UI (by clicking the start button). We recommend storing this token as a secret in your CI/CD tool and then passing it to the Deepfactor scan pipeline step.
2. Execute the Deepfactor scan command in your pipeline #
Sample command to scan a container image:
docker run --pull=always --rm -e DF_RUN_TOKEN=$DF_RUN_TOKEN --network host \
-v /var/run/docker.sock:/var/run/docker.sock \
-v $WORKSPACE/$OUTPUT_FOLDER:/$OUTPUT_FOLDER \
public.ecr.aws/deepfactor/df/runtime:latest \
dfctl scan -f $REPORT_FORMAT -O /$OUTPUT_FOLDER/$OUTPUT_FILE_NAME $IMAGE_NAME
Sample command to scan source code:
docker run --pull=always --rm -e DF_RUN_TOKEN=$DF_RUN_TOKEN --network host \
-v /var/run/docker.sock:/var/run/docker.sock \
-v $WORKSPACE/$OUTPUT_FOLDER:/$OUTPUT_FOLDER \
-v $WORKSPACE/$SCAN_PATH:$SCAN_PATH \
public.ecr.aws/deepfactor/df/runtime:latest \
dfctl scan -s fs -a $APPLICATION_NAME -c $COMPONENT_NAME -V $ARTIFACT_VERSION \
-f $REPORT_FORMAT -O /$OUTPUT_FOLDER/$OUTPUT_FILE_NAME $SCAN_PATH
where:
DF_RUN_TOKEN is the Deepfactor run token, preferably stored as a secret in your CI/CD tool
OUTPUT_FOLDER is the folder in which you would like to store the scan output reports. This directory has to be mounted to the scan container.
REPORT_FORMAT is the report format which can be one of table, json, cyclonedx, spdx or spdx-json
OUTPUT_FILE_NAME is the name of the scan output report file name
IMAGE_NAME is the image you want to scan in the pipeline
APPLICATION_NAME is the name of the application for filesystem scan (you can provide application name of your choice)
COMPONENT_NAME is the name of the component for filesystem scan (you can provide component name of your choice)
ARTIFACT_VERSION is the version of the artifact in the case of filesystem scan
SCAN_PATH is the directory path you would like to scan. This directory has to be mounted to the scan container so it can access and scan the file system directory.
Jenkins #
The following section outlines sample scripts for common scan scenarios in Jenkins.
Store Deepfactor run token as a secret in Jenkins #
As mentioned earlier, we recommend storing the Deepfactor run token as a secret. You can achieve that in Jenkins using the following steps
- Navigate to Mange Jenkins > Manage Credentials
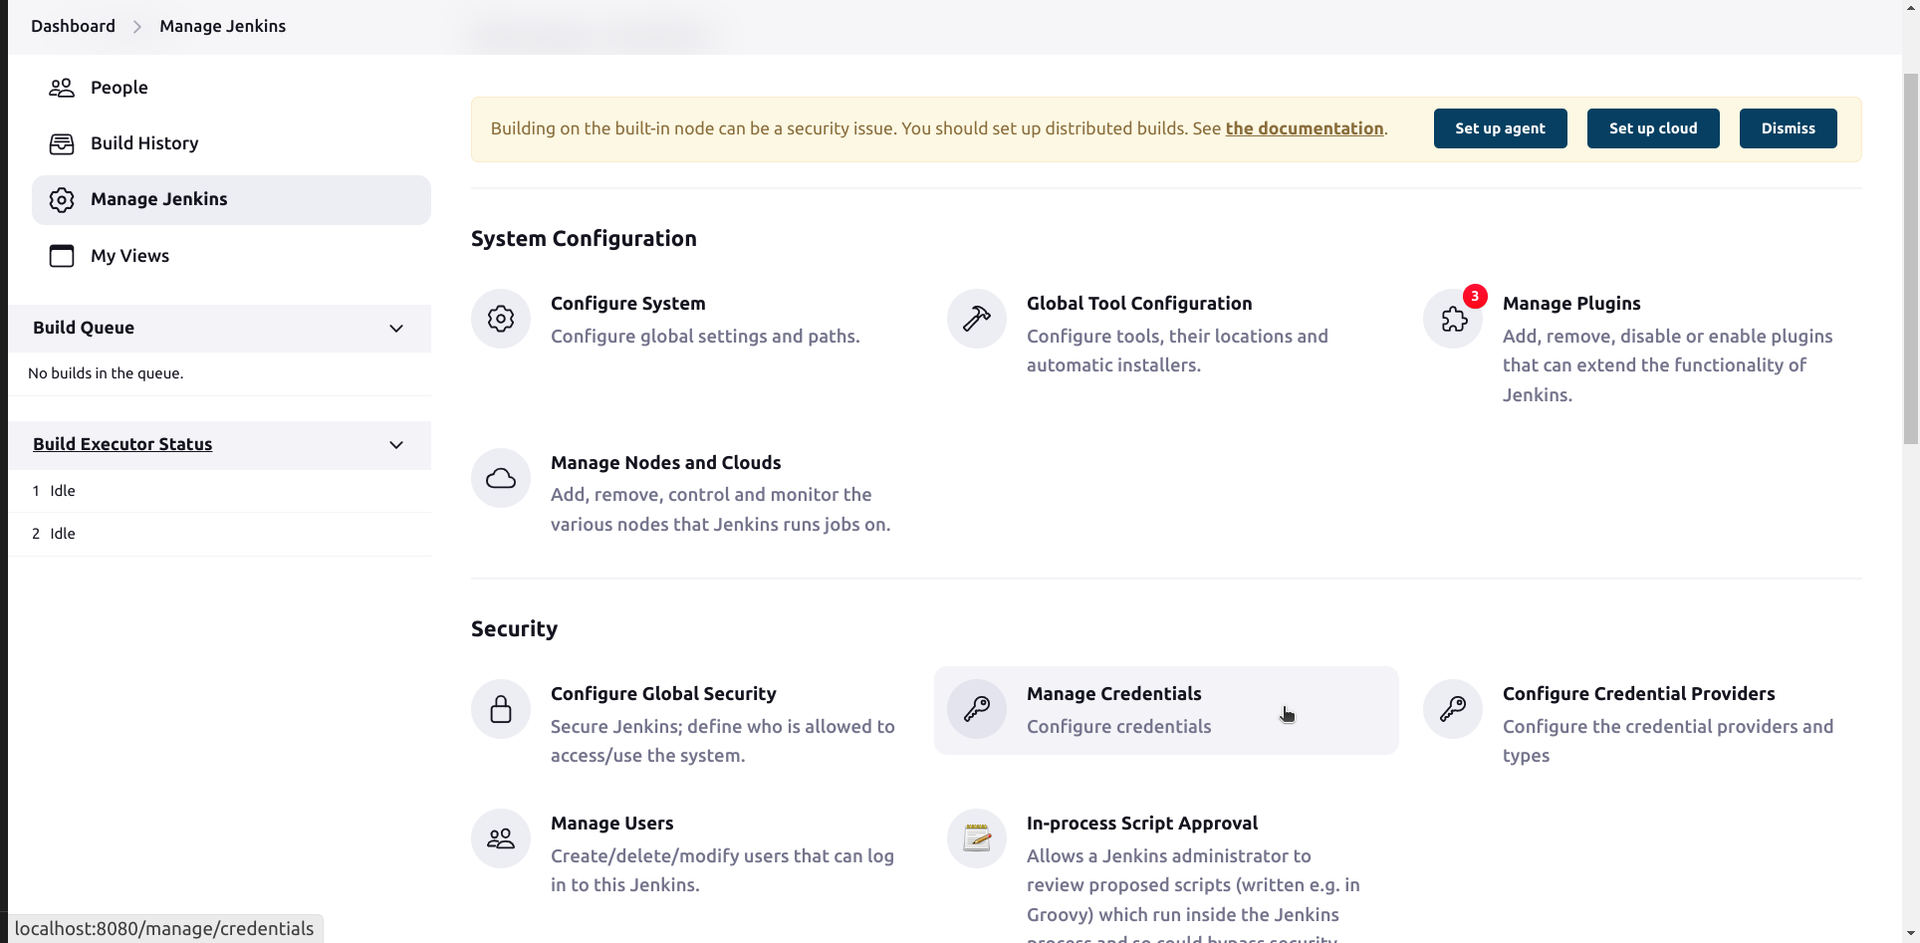
- Navigate to System > Global credentials and click on Add Credentials
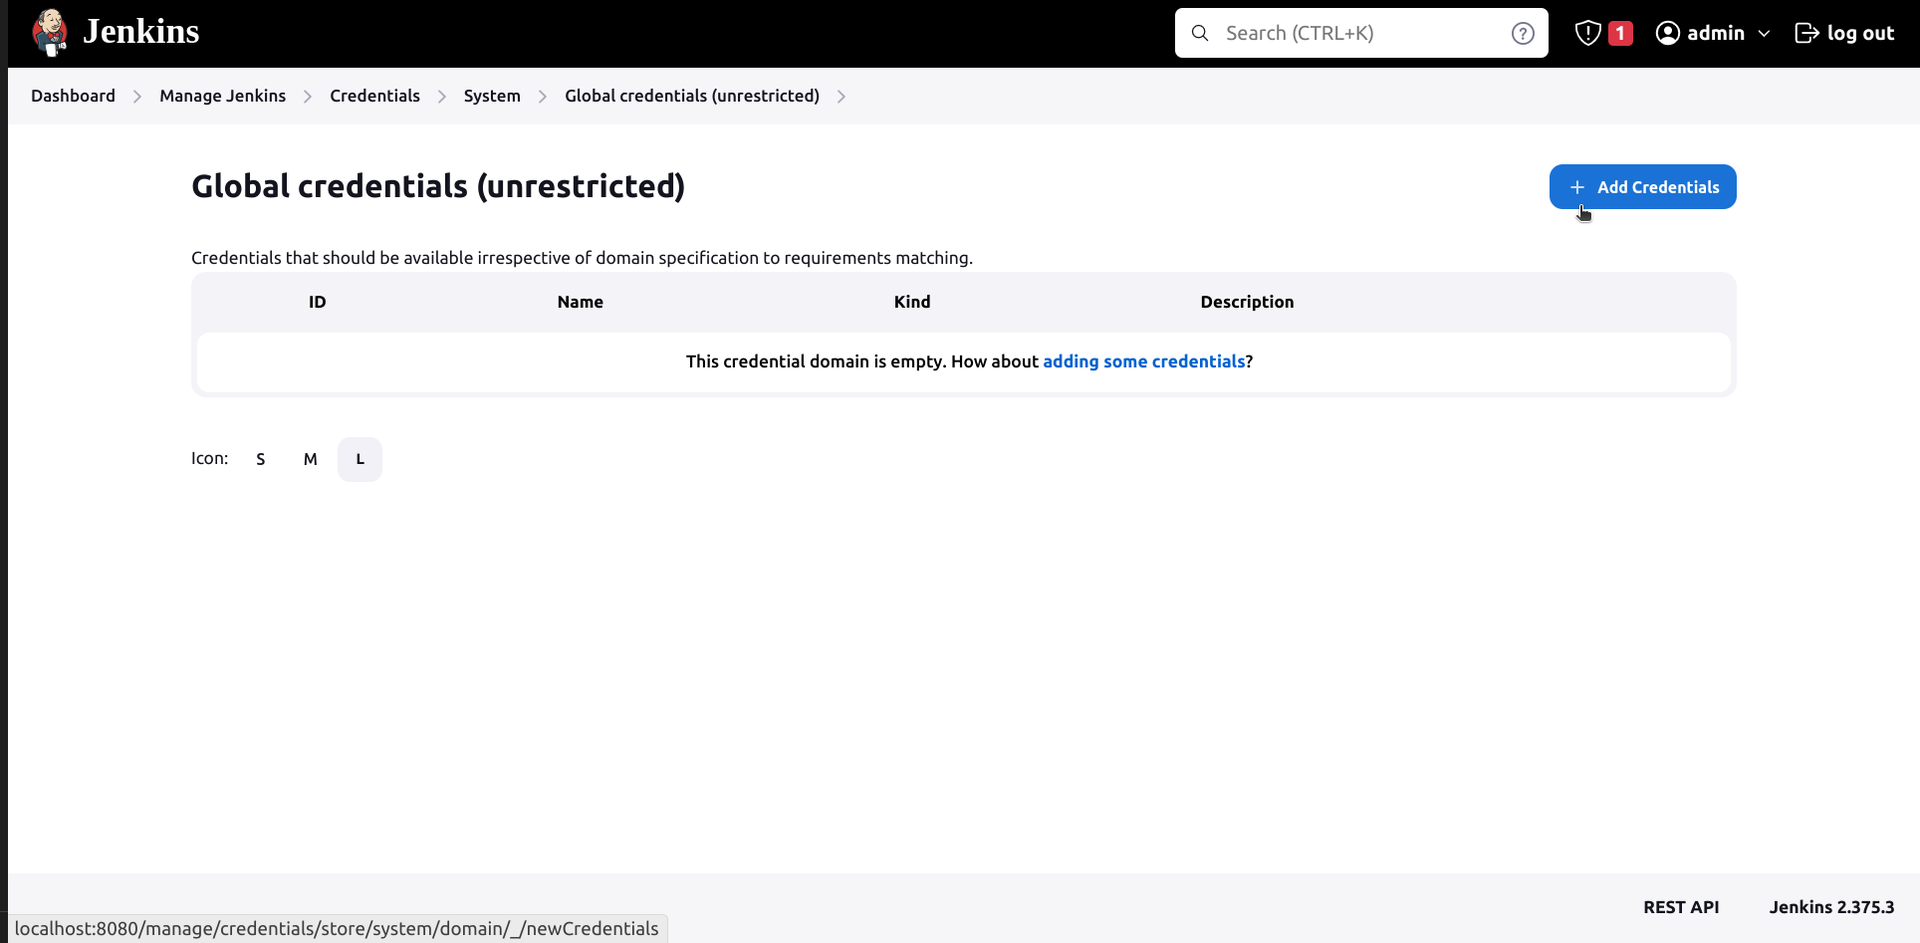
- Select Kind “Secret text” and Scope as preferred
- Enter ID as DF_RUN_TOKEN
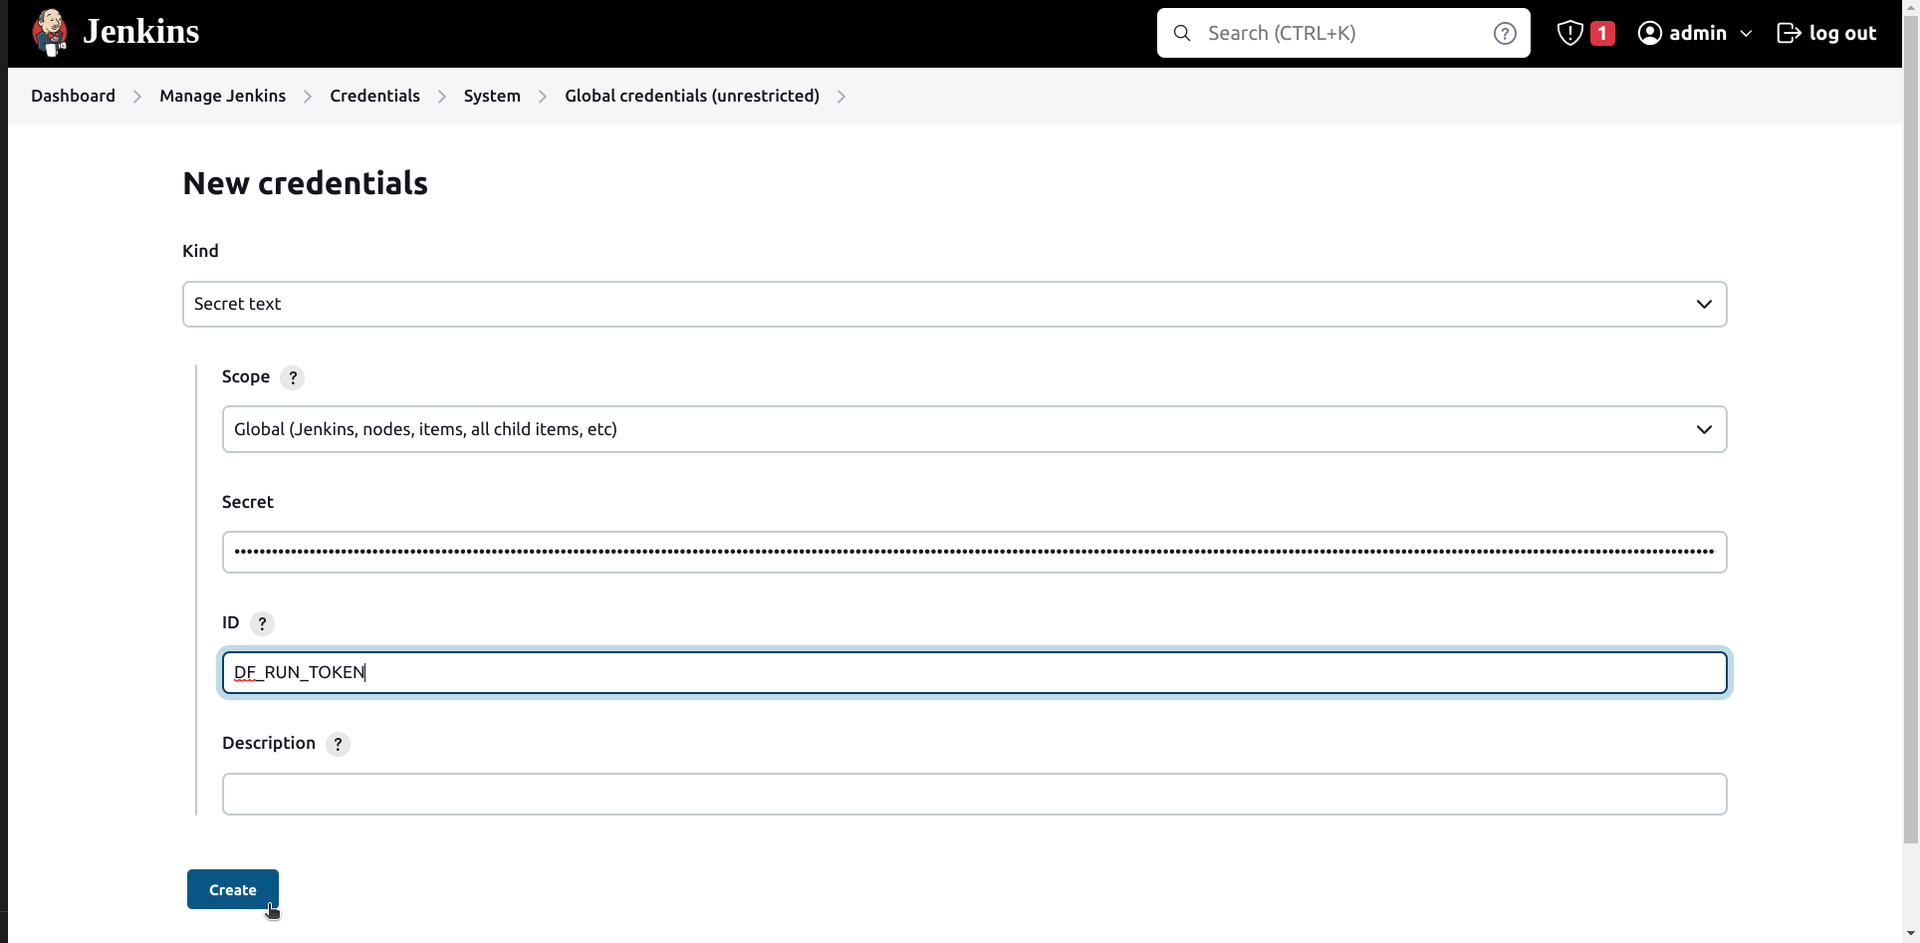
- The Secret (DF_RUN_TOKEN) can be obtained from Deepfactor portal UI
- Click on create. Now we will be able to reference the DF_RUN_TOKEN secret in our pipeline
Scan Examples #
Scan a container image
pipeline {
    // agent any
    // or an agent node
    agent any
    environment {
        // fetch run token from credentials
        DF_RUN_TOKEN=credentials('DF_RUN_TOKEN')
    }
    stages {
        stage('Deepfactor static scan') {
            steps {
                sh('docker run --pull=always --rm -e DF_RUN_TOKEN=$DF_RUN_TOKEN --network host -v /var/run/docker.sock:/var/run/docker.sock public.ecr.aws/deepfactor/df/runtime:latest dfctl scan node:alpine')
            }
        }
    }
}
Scan a locally built container image
In this pipeline example, we will perform the following steps
- Check out source code from git. Build container image.
- Scan the built container image using Deepfactor.
pipeline {
    // agent any
    // or an agent node
    agent any
    environment {
        DF_RUN_TOKEN=credentials('DF_RUN_TOKEN')
    }
    stages {
        stage('Pull source code and build image') {
            steps {
                git 'https://github.com/dockersamples/linux_tweet_app.git'
                sh 'docker build . -t tweet'
            }
        }
        stage('Deepfactor static scan') {
            steps {
                sh('docker run --pull=always --rm -e DF_RUN_TOKEN=$DF_RUN_TOKEN --network host -v /var/run/docker.sock:/var/run/docker.sock public.ecr.aws/deepfactor/df/runtime:latest dfctl scan tweet')
            }
        }
    }
}
Scan a container image and generate CycloneDX SBOM
In this pipeline example, we will perform the following steps
- Check out source code from git. Build container image.
- Scan the built container image using Deepfactor and generate CycloneDX SBOM.
- Store the CycloneDX SBOM file as a pipeline artifact.
Note: As mentioned in the earlier section, since we want the store the scan output, CycloneDX SBOM file as a pipeline artifact, we have to mount a volume where the Deepfactor scan container can store the requested output files.
pipeline {
    // agent any
    // or an agent node
    agent any
    environment {
        DF_RUN_TOKEN=credentials('DF_RUN_TOKEN')
        OUTPUT_FOLDER='archive'
        OUTPUT_FILE_NAME= 'report'
    }
    stages {
        stage('Pull source code and build image') {
            steps {
                git 'https://github.com/dockersamples/linux_tweet_app.git'
                sh 'docker build . -t tweet'
            }
        }
        stage('Deepfactor static scan') {
            steps {
                sh('docker run --pull=always --rm -e DF_RUN_TOKEN=$DF_RUN_TOKEN --network host -v /var/run/docker.sock:/var/run/docker.sock -v "$WORKSPACE/$OUTPUT_FOLDER:/$OUTPUT_FOLDER" public.ecr.aws/deepfactor/df/runtime:latest dfctl scan tweet -f cyclonedx -O "/$OUTPUT_FOLDER/$OUTPUT_FILE_NAME"')
            }
        }
        stage('Archive output') {
            steps {
                archiveArtifacts artifacts: OUTPUT_FOLDER + '/*'
            }
        }
    }
}
Scan source code
In this pipeline example, we will perform the following steps
- Check out source code from git.
- Scan the source code using Deepfactor and generate CycloneDX SBOM.
- Store the CycloneDX SBOM file as a pipeline artifact.
Note: As mentioned in the earlier section, since we want the scan the source code directory, we have to mount a volume to the scan container so Deepfactor scanner can access and scan the source code.
pipeline {
    // agent any
    // or an agent node
    agent any
    environment {
        DF_RUN_TOKEN=credentials('DF_RUN_TOKEN')
        OUTPUT_FOLDER='archive'
        OUTPUT_FILE_NAME= 'report'
    }
    stages {
        stage('Pull source code') {
            steps {
                git 'https://github.com/django-ve/django-helloworld.git'
            }
        }
        stage('Deepfactor static scan') {
            steps {
                // scanning the entire workspace
                sh('docker run --pull=always --rm -e DF_RUN_TOKEN=$DF_RUN_TOKEN --network host -v /var/run/docker.sock:/var/run/docker.sock -v "$WORKSPACE/$OUTPUT_FOLDER:/$OUTPUT_FOLDER" -v "$WORKSPACE:$WORKSPACE" public.ecr.aws/deepfactor/df/runtime:latest dfctl scan -s fs -a django -c hello -V 1 -f cyclonedx -O "/$OUTPUT_FOLDER/$OUTPUT_FILE_NAME" "$WORKSPACE"')
            }
        }
        stage('Archive output') {
            steps {
                archiveArtifacts artifacts: OUTPUT_FOLDER + '/*'
            }
        }
    }
}
Scan image and gate build
In this pipeline example, we will perform the following steps
-
Check out source code from git. Build a container image.
-
Set exit-code (-X) as 1, which be returned by dfctl scan command if there is a policy violation
-
Scan the built container image using Deepfactor and generate CycloneDX and Spdx SBOM.
-
Decide whether to fail the build or not based on exit code returned by dfctl scan
-
Store the SBOMs as pipeline artifact.
def EXIT_CODE
pipeline {
    // agent any
    // or an agent node
    agent any
    environment {
        DF_RUN_TOKEN=credentials('DF_RUN_TOKEN')
        OUTPUT_FOLDER='archive'
        OUTPUT_FILE_NAME='report'
        IMAGE_NAME='tweet'
    }
    stages {
        stage('Pull source code and build image') {
            steps {
                git 'https://github.com/dockersamples/linux_tweet_app.git'
                sh 'docker build . -t $IMAGE_NAME'
            }
        }
        stage('Deepfactor static scan') {
            steps {
                script {
                    EXIT_CODE = sh(
                        script: 'docker run --pull=always --rm -e DF_RUN_TOKEN=$DF_RUN_TOKEN --network host -v /var/run/docker.sock:/var/run/docker.sock -v "$WORKSPACE/$OUTPUT_FOLDER:/$OUTPUT_FOLDER" public.ecr.aws/deepfactor/df/runtime:latest dfctl scan -f cyclonedx,spdx -O "/$OUTPUT_FOLDER/$OUTPUT_FILE_NAME" -X 1 $IMAGE_NAME',
                        returnStatus: true
                    )
                    echo EXIT_CODE.toString()
                    if (EXIT_CODE != 0) {
                        currentBuild.result = 'FAILURE'
                    }
                }
            }
        }
        stage('Push image') {
            steps {
                script {
                    if (EXIT_CODE == 0) {
                        echo 'pushing image...'
                    } else {
                        echo 'skipping due to previous error!'
                    }
                }
            }
        }

        stage('Archive reports') {
            steps {
                script {
                    archiveArtifacts artifacts: OUTPUT_FOLDER + '/*'
                }
            }
        }
    }
}
GitLab #
Prerequisite #
- The GitLab runners should have docker installed. Please refer to the following article to know how to install docker on your GitLab runners
Use Docker to build Docker images | GitLab - Make sure that you have enough permissions to install the command line tool provided by Deepfactor in your gitlab-runner host machine
Store Deepfactor run token as a variable in GitLab #
As mentioned earlier, we recommend storing the Deepfactor run token as a secret. You can achieve that in GitLab using the following steps
- Navigate in your project to Settings > CI/CD > Variables and click Add variable
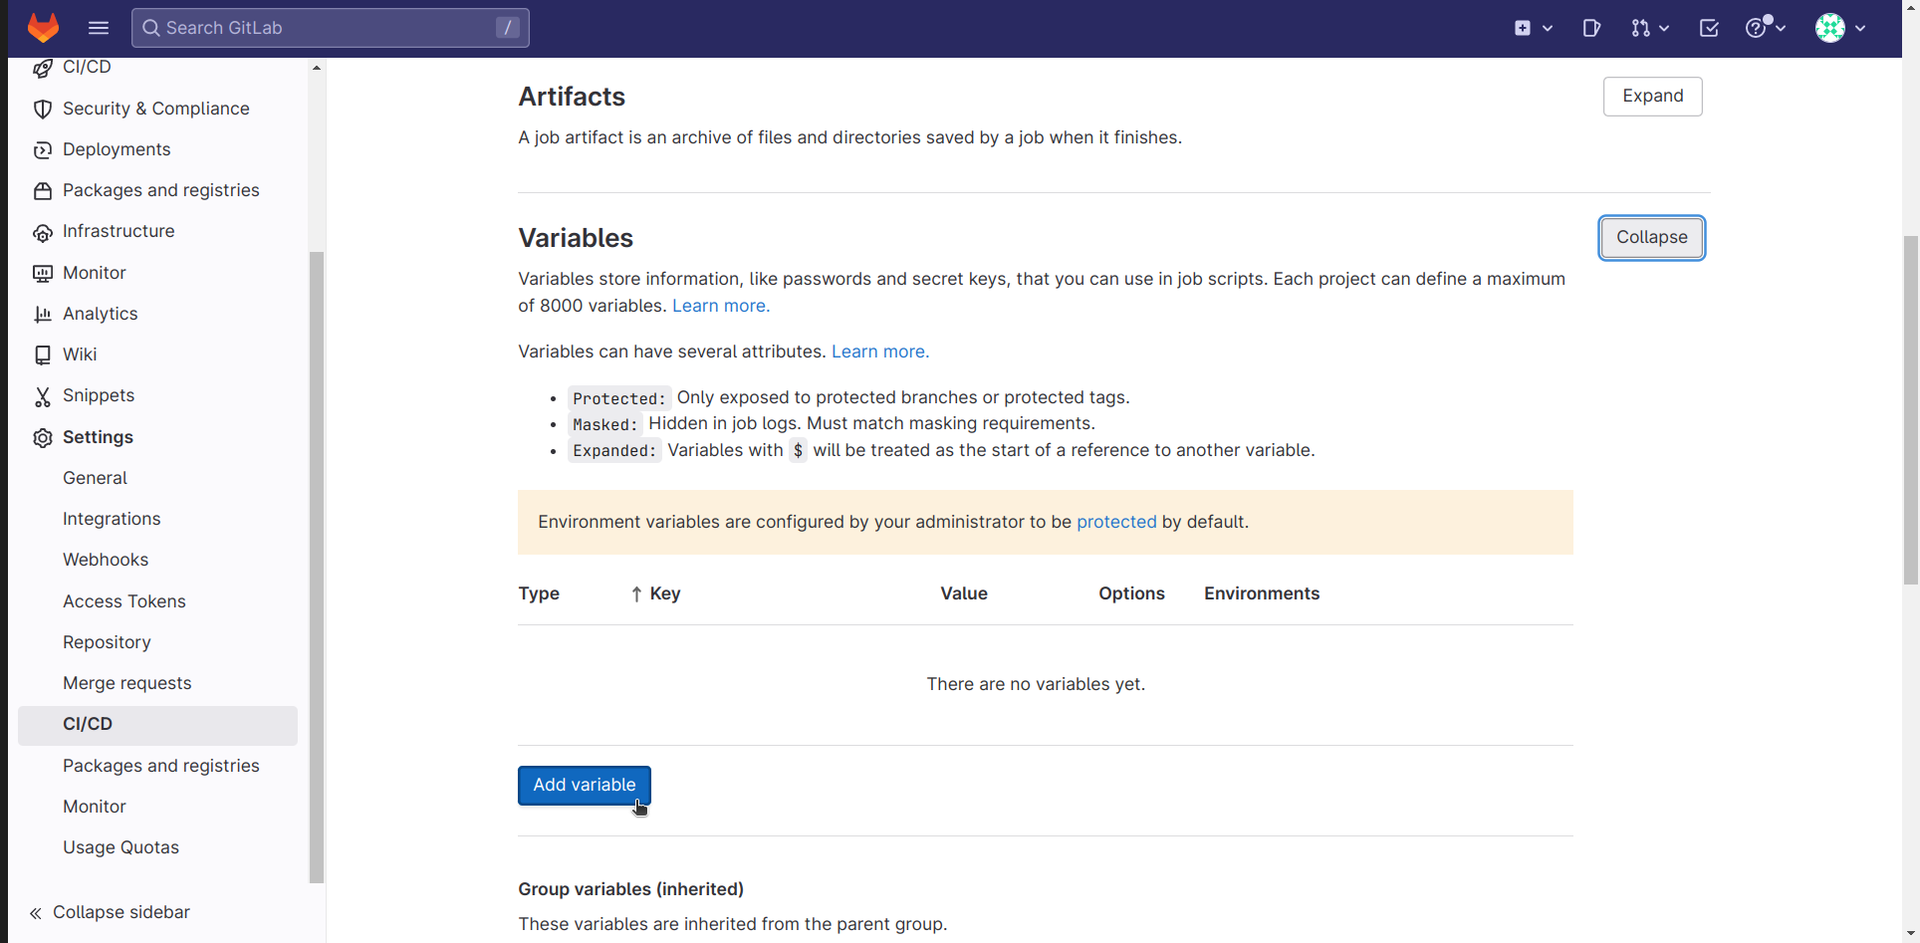
- Add key DF_RUN_TOKEN, and make sure to check Mask variable
- The value (DF_RUN_TOKEN) can be obtained from Deepfactor portal
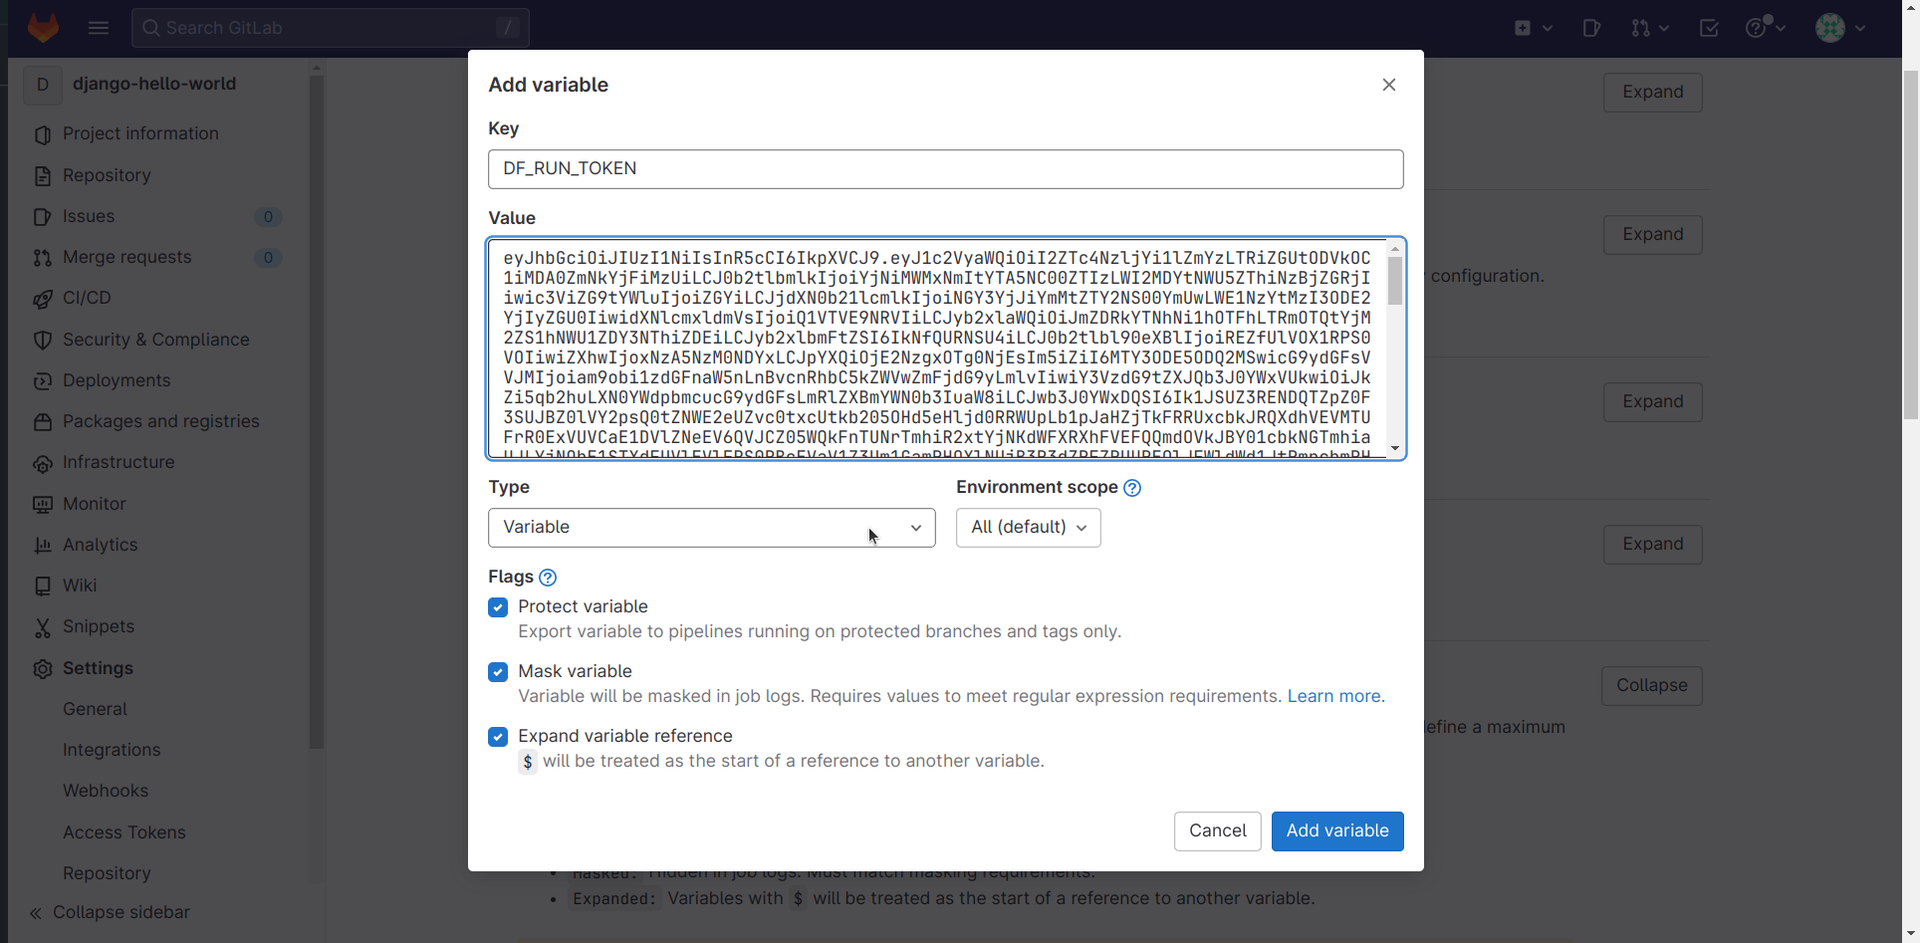
- Once added DF_RUN_TOKEN can be referenced in pipeline script
Scan examples #
Scan a container image and generate CycloneDX SBOM
In this pipeline example, we will perform the following steps
- Build a container image.
- Scan the built container image using Deepfactor and generate CycloneDX SBOM.
- Store the CycloneDX SBOM file as a pipeline artifact.
variables:
  OUTPUT_FORMAT: cyclonedx
  OUTPUT_FILENAME: "report"
  ARTIFACTS_FOLDER_NAME: "artifacts"
  IMAGE_NAME: "helloworld"

build_image:
  stage: build
  script:
    - docker build . -t $IMAGE_NAME

scan_image:
  stage: test
  before_script:
      - curl https://repo.deepfactor.io/install-dfctl.sh | sh --
      - dfctl version
      - mkdir -p $ARTIFACTS_FOLDER_NAME
  script:
    - dfctl scan -f $OUTPUT_FORMAT -O $ARTIFACTS_FOLDER_NAME/$OUTPUT_FILENAME $IMAGE_NAME
  artifacts:
    paths:
      - $ARTIFACTS_FOLDER_NAME/*
Scan source code
In this pipeline example, we will perform the following steps
- Scan the source code using Deepfactor and generate CycloneDX SBOM.
- Store the CycloneDX SBOM file as a pipeline artifact.
variables:
  APPLICATION_NAME: "django"
  COMPONENT_NAME: "helloworld"
  VERSION: "1.1"
  OUTPUT_FORMAT: cyclonedx
  OUTPUT_FILENAME: "report"
  ARTIFACTS_FOLDER_NAME: "artifacts"

scan_files:
  stage: test
  before_script:
      - curl https://repo.deepfactor.io/install-dfctl.sh | sh --
      - dfctl version
      - mkdir -p $ARTIFACTS_FOLDER_NAME
  script:
    - dfctl scan -s fs -a $APPLICATION_NAME -c $COMPONENT_NAME -V $VERSION -f $OUTPUT_FORMAT -O $ARTIFACTS_FOLDER_NAME/$OUTPUT_FILENAME $CI_PROJECT_DIR
  artifacts:
    paths:
      - $ARTIFACTS_FOLDER_NAME/*
Scan source code and gate build
In this pipeline example, we will perform the following steps
-
Scan the source code using Deepfactor and generate CycloneDX and Spdx SBOM.
-
Store the SBOM files as pipeline artifacts.
-
Deploy application only when there is no policy violation
variables:
  APPLICATION_NAME: "django"
  COMPONENT_NAME: "helloworld"
  VERSION: "1.1"
  OUTPUT_FORMAT: cyclonedx,spdx-json
  OUTPUT_FILENAME: "report"
  ARTIFACTS_FOLDER_NAME: "artifacts"
  POLICY_VIOLATION_EXIT_CODE: 1

scan_files:
  stage: test
  before_script:
    - curl https://repo.deepfactor.io/install-dfctl.sh | sh --
    - dfctl version
    - mkdir -p $ARTIFACTS_FOLDER_NAME
  script:
    - dfctl scan -s fs -a $APPLICATION_NAME -c $COMPONENT_NAME -V $VERSION -X $POLICY_VIOLATION_EXIT_CODE -f $OUTPUT_FORMAT -O $ARTIFACTS_FOLDER_NAME/$OUTPUT_FILENAME $CI_PROJECT_DIR
  artifacts:
    when: always
    paths:
      - $ARTIFACTS_FOLDER_NAME/*

deploy:
  stage: deploy
  script:
    - echo "deploying application..."
Github #
The following section outlines sample scripts for common scan scenarios in Github.
Store Deepfactor run token as a secret in Github #
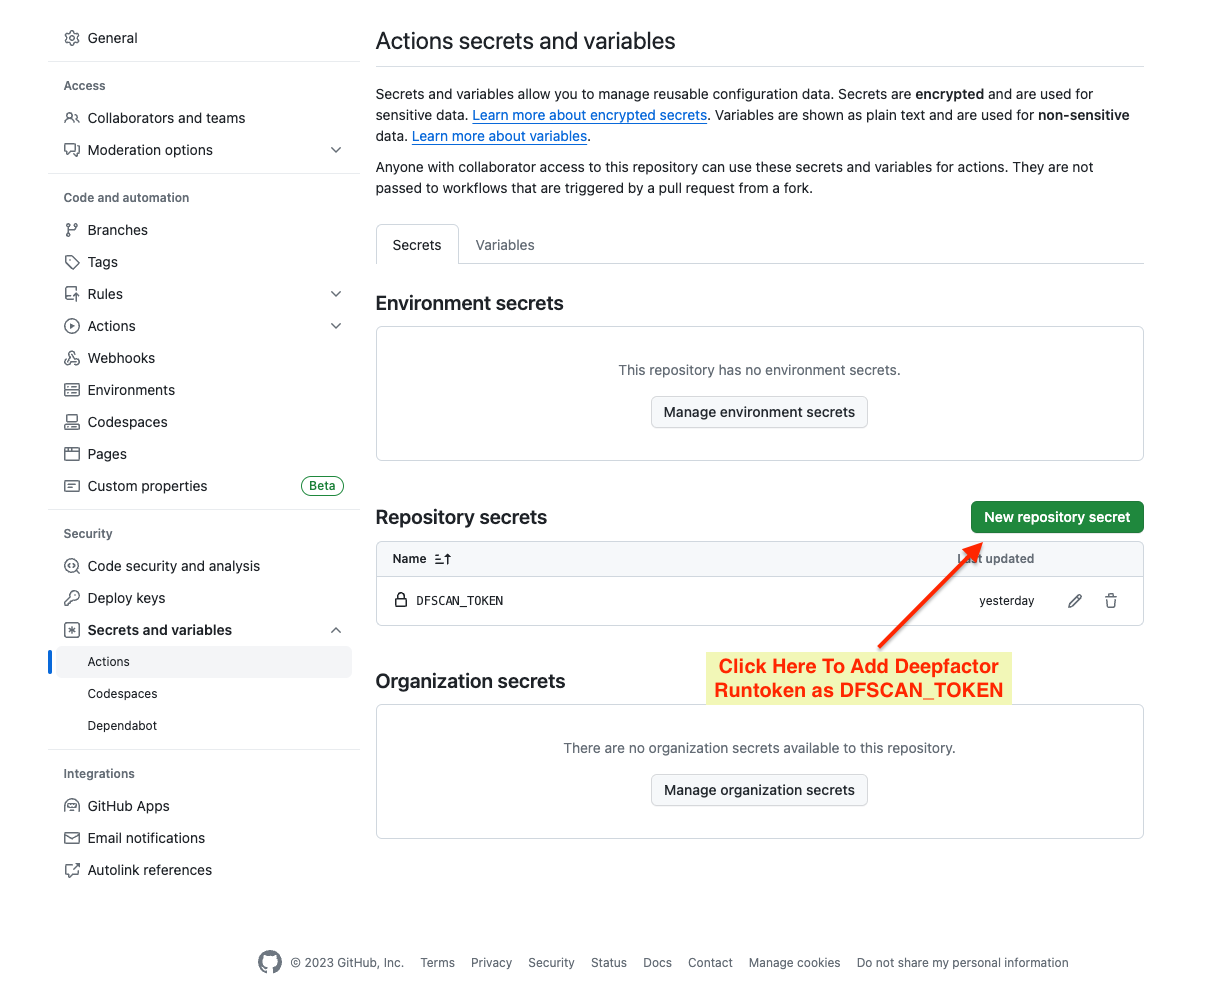
We recommend storing the Deepfactor run token as a Repository secret in your GitHub repository and then passing it to the GitHub action to perform the scan. The following screen shot provides information to achieve this.
Scan examples #
Scan source code for every pull request (PR)
In this pipeline example, we are scanning the source code using dfctl for every new or reopened PR raised against the target branch 1.0-GA. Any policy violation will cause non-zero exit code for GH action, thereby blocking merge of the PR.
name: dfctl-scan-pr
on:
  workflow_dispatch:
    inputs:
      dfctlversion:
        description: 'dfctl version to use'
        required: true
        default: 'latest'
  pull_request:
    branches: [1.0-GA]
    types: [opened, reopened]
jobs:
  Build:
    runs-on: ubuntu-latest
    steps:
      - name: Checkout code
        uses: actions/checkout@v2

      - name: Configure Git
        run: |
          git config user.name "$GITHUB_ACTOR"
          git config user.email "$GITHUB_ACTOR@users.noreply.github.com"

      - name: scan filesystem with dfctl
        env:
          DFCTL_VERSION: ${{ github.event.inputs.dfctlversion || 'latest' }}
          DF_RUN_TOKEN: ${{ secrets.DFSCAN_TOKEN }}
          appName: ${{ github.event.repository.name }}
          compName: ${{ github.base_ref }}
          projDir: ${{ github.workspace }}
        run: |
          if [ "${{ github.event_name }}" == "pull_request" ]; then
            repoVersion=${{ github.head_ref }}
          else
            repoVersion=${{ github.ref_name }}
          fi
          docker run --pull=always --rm -e DF_RUN_TOKEN=$DF_RUN_TOKEN -v $projDir:/home/projdir public.ecr.aws/deepfactor/df/runtime:$DFCTL_VERSION dfctl scan -s fs -a $appName -c $compName -V $repoVersion -X 1 /home/projdir
Scan source code for every merge request (MR)
In this pipeline example, we are scanning the source code using dfctl for every MR raised against the target branch 1.0-GA. Since this GH action runs for a merge request, it does not block the merge even if there are policy violations. The results are however sent to the portal and you can view the trend of vulnerabilities across different builds of your artifact.
name: dfctl-scan-mr
on:
  workflow_dispatch:
    inputs:
      dfctlversion:
        description: 'dfctl version to use'
        required: true
        default: 'latest'
  pull_request:
    branches: [1.0-GA]
    types: [closed]
jobs:
  if_merged:
   if: github.event.pull_request.merged == true
   runs-on: ubuntu-latest
   steps:
     - name: Checkout code
       uses: actions/checkout@v2

     - name: Configure Git
       run: |
         git config user.name "$GITHUB_ACTOR"
         git config user.email "$GITHUB_ACTOR@users.noreply.github.com"

     - name: scan filesystem with dfctl
       env:
         DFCTL_VERSION: ${{ github.event.inputs.dfctlversion || 'latest' }}
         DF_RUN_TOKEN: ${{ secrets.DFSCAN_TOKEN }}
         appName: ${{ github.event.repository.name }}
         compName: ${{ github.base_ref }}
         projDir: ${{ github.workspace }}
       run: |
         if [ "${{ github.event_name }}" == "pull_request" ]; then
           repoVersion=${{ github.head_ref }}
         else
           repoVersion=${{ github.ref_name }}
         fi
         docker run --pull=always --rm -e DF_RUN_TOKEN=$DF_RUN_TOKEN -v $projDir:/home/projdir public.ecr.aws/deepfactor/df/runtime:$DFCTL_VERSION dfctl scan -s fs -a $appName -c $compName -V $repoVersion -R $compName /home/projdir